TABLE OF CONTENTS
Preface
This guide describes how to integrate Milesight LoRaWAN sensors with the Siemens Building X platform using a Milesight UG65 LoRaWAN gateway and a Siemens Connect Gateway. The guide uses the X500 device as an example, but the same process can be applied to X200 and X300 devices.
The UG65 acts as both the LoRaWAN network server for the sensors and a BACnet/IP device server that exposes sensor data over the local network. The X500 gateway runs the BACnet Connector and ONEconnectivity applications, which discover and relay the BACnet data to the Building X cloud platform.
Data flow:
Milesight LoRaWAN sensor → Milesight UG65 (LoRaWAN Network Server + BACnet/IP Server) → Siemens X500 (BACnet Connector → ONEconnectivity → EDS Data Plane) → Siemens Building X (Data Setup → Data Visualizer).
- Milesight UG65 LoRaWAN gateway, connected to the same LAN as the X500.
- One or more Milesight LoRaWAN sensors (this guide uses an AM308L and a WT304 as examples).
- Siemens edge gateway (such as CXG3.X500) registered and online in Building X.
- Building X subscription with Data Setup and Devices applications.
- Milesight Development Platform account (for device management; optional but recommended).
2. Milesight UG65 Gateway Configuration
2.1 Verify Network Connectivity
Enable Wireless Network Connection on your computer and search for access point Gateway_XXXXXX(=last 6 digits of WLAN MAC address) to connect it, the default Wi-Fi
password is iotpassword.
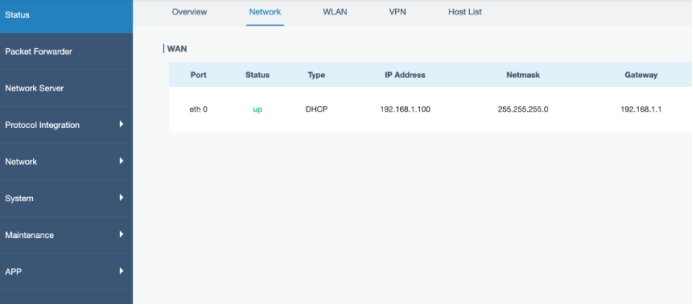
Open a Web browser on your PC (Chrome is recommended) and type in the IP address https://192.168.1.1 to access the web GUI. Navigate to Status > Network and confirm that the WAN interface (eth 0) has received a valid DHCP address on the local network.
Go to Network > Port to review or change the WAN port settings. The default configuration uses DHCP Client, which is suitable for most installations.
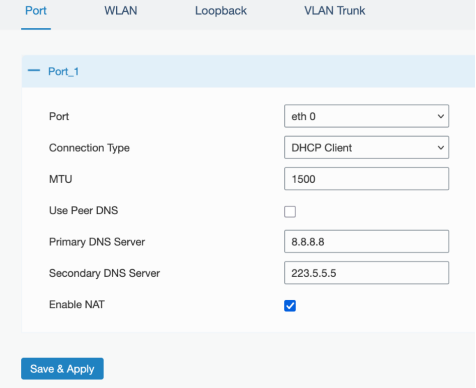 Note: Make sure the UG65 and the X500 are on the same IP subnet so that BACnet/IP communication works without routing.
2.2 Configure the LoRaWAN Network Server
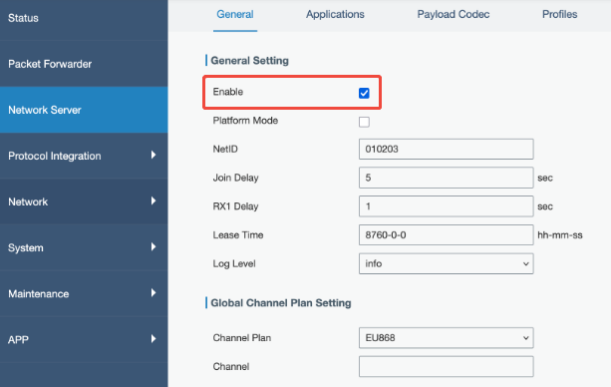
Navigate to Network Server > General and enable the built-in LoRaWAN Network Server. Set the appropriate channel plan for your region (EU868 in this example).
2.3 Create Application
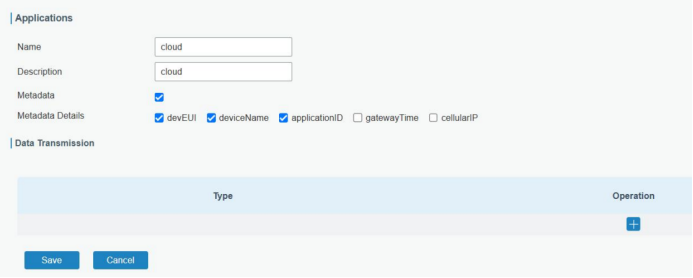
Navigate to Network Server > Applications and create an application for device in the same collection.
2.4 Configure the BACnet Server
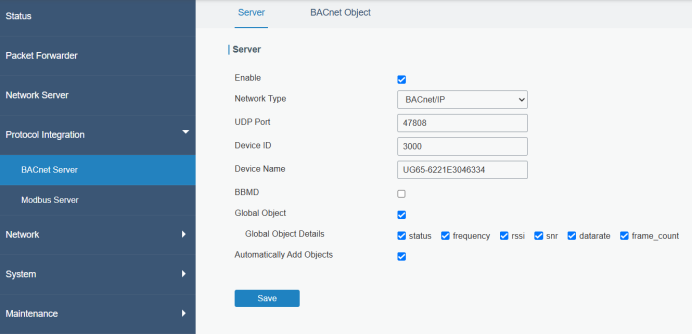
The UG65 exposes sensor data as BACnet objects over BACnet/IP. Navigate to Protocol Integration > BACnet Server > Server tab and configure as follows:
Field | Value |
Enable | Checked |
Network Type | BACnet/IP |
UDP Port | 47808 |
Device ID | 30000 |
Device Name | UG65-6221E3770271 (or your gateway serial number) |
BBMD | Unchecked (same subnet as X500) |
Global Object | Checked |
Global Object Details | status, frequency, rssi, snr, datarate, frame_count |
Automatically Add Objects | Checked |
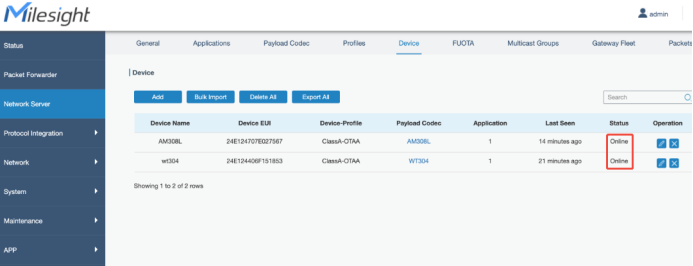
After adding all sensors, the Device tab shows each device with its status. Wait for sensors to join the network (Status = Online).
Tip:
The UG65 includes a built-in Payload Codec Library. Navigate to Network Server > Payload Codec and click Obtain to download the latest codecs (requires internet access). Codecs for all standard Milesight devices are included.
2.5 Add LoRaWAN Sensors
Go to Network Server > Device and click Add to register each sensor. The example below shows an AM308L 8-in-1 indoor air quality sensor.
Device Name | AM308L |
Device EUI | 24E124707E027567 |
Device Profile | ClassA-OTAA |
Application | cloud (the one you just created) |
Payload Codec | AM308L |
fPort | 85 (default fPort for Milesight sensor is 85) |
Application Key | Match with the sensor application key |
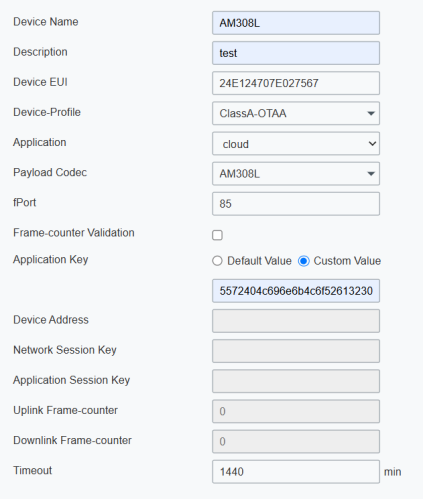
Click Save. Then open the BACnet Object tab to verify that BACnet object groups have been created automatically for each registered sensor.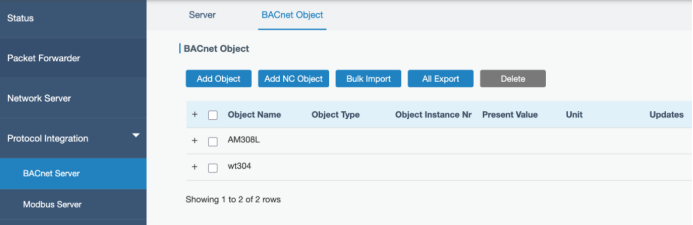
Note: Each sensor generates multiple BACnet Analog Input objects — one per measurement channel (temperature, humidity, CO₂, etc.). The total for two devices in this example is 192 BACnet properties.
3. Register the UG65 in the Milesight Development Platform (Optional)
For centralized device management, the UG65 can be registered in the Milesight Development Platform at console.milesight.com. This allows remote configuration and firmware updates.
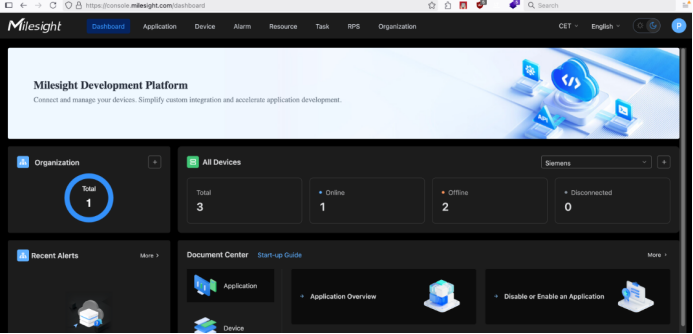
Follow this article to add your gateway to platform. Connect a Device
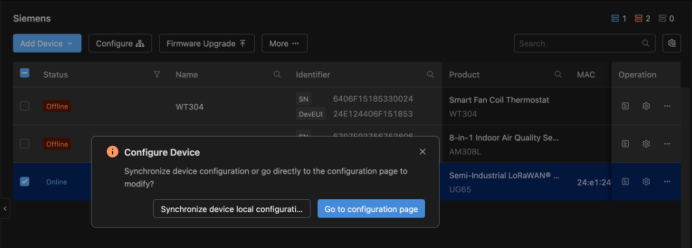
From the Device menu, select the UG65 and click Configure. When prompted, choose Go to configuration page to open the gateway's local web UI through the platform tunnel, or choose Synchronize device local configuration to push settings.
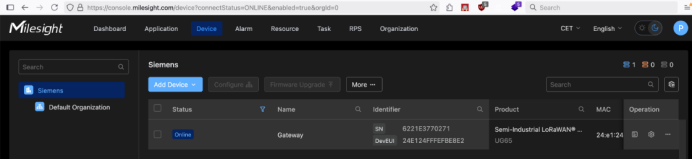
Once registered and online, the UG65 appears in the device list with Status = Online.
4. Set Up the Siemens X500 in Building X
4.1 Verify the X500 is Registered and Online
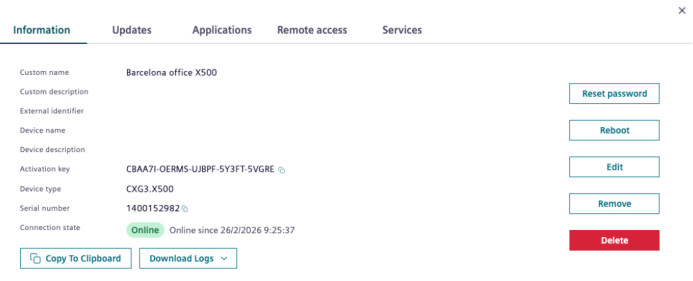
Log in to Building X and open the Devices app. Locate your X500 gateway in the device list. In our example, the device type is CXG3.X500.
 Click the device to open its details. On the Information tab, confirm that Connection state is Online.
4.2 Verify Installed Applications
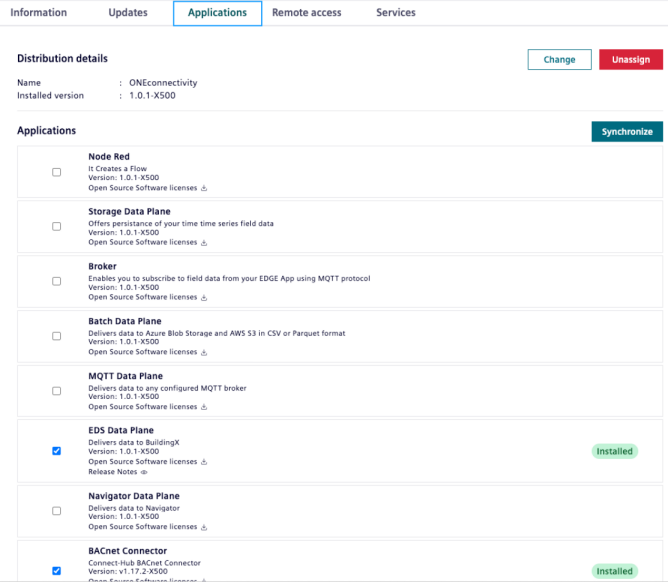
Open the Applications tab. Confirm that both EDS Data Plane and BACnet Connector are installed (shown with a green Installed badge). If not installed, check the appropriate checkboxes and click Synchronize.
4.3 Verify Services are Running
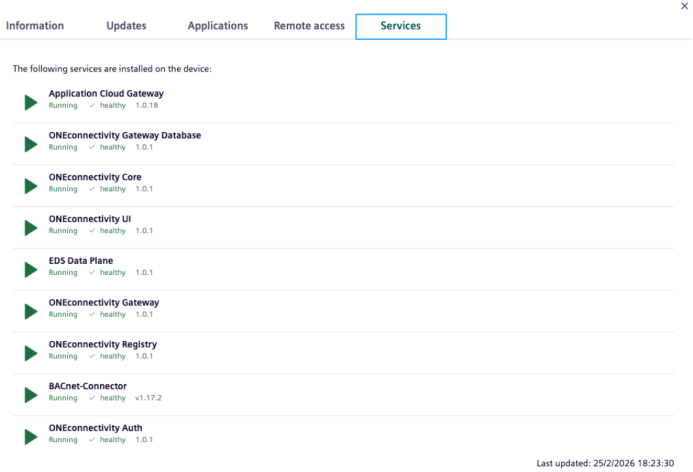
Open the Services tab. All services should show status Running with a healthy indicator. Key services for this integration are EDS Data Plane, BACnet-Connector, and the ONEconnectivity services.
4.4 Access Remote UIs
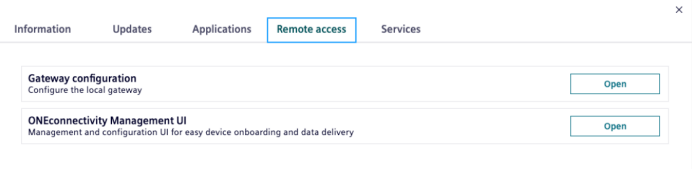
Open the Remote access tab. Two tunnels are available:
- ONEconnectivity Management UI – for reviewing discovered things and data plane configuration
- Gateway configuration – the X500 local admin UI
Click Open next to each service to access it through the Building X secure tunnel.
5. Configure the BACnet Connector
Open the Gateway configuration remote access link (or navigate to the X500 device page and select the BACnet Connector). The BACnet Connector UI opens at SIEMENS > BACnet Connector.
5.1 Configure the BACnet Network Port
Go to Network configuration in the left menu. If no network is configured, click the + button to add one. If one exists, click the edit (pencil) icon to review the settings.
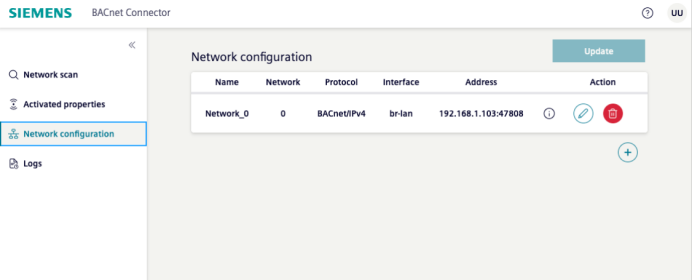
In the Update network configuration dialog, set the Network port section as follows:
Field | Value |
Name | Network_0 |
Protocol | BACnet/IPv4 |
Network number | 0 |
Network adapter | br-lan |
IP address | 192.168.1.103/24 (X500 LAN IP) |
UDP port | 47808 |
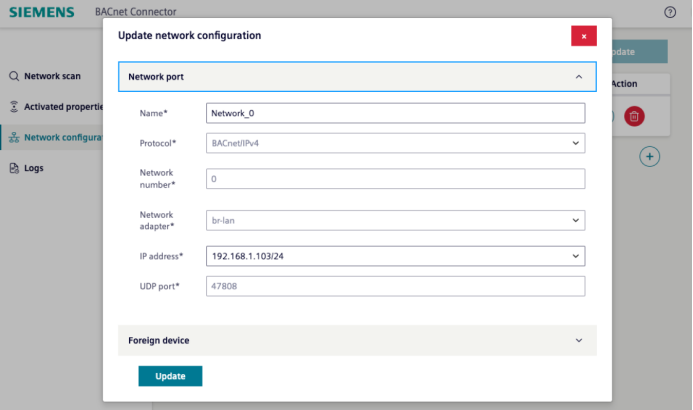
Click Update to save, then click the Update button on the Network configuration page to apply the changes.
5.2 Scan the Network
Go to Network scan in the left menu and click Scan network. In the dialog, enable Range and set both the minimum and maximum BACnet Device ID to 30000 (matching the Device ID configured on the UG65 BACnet Server). Enable Global to broadcast the scan across the network, then click Start.
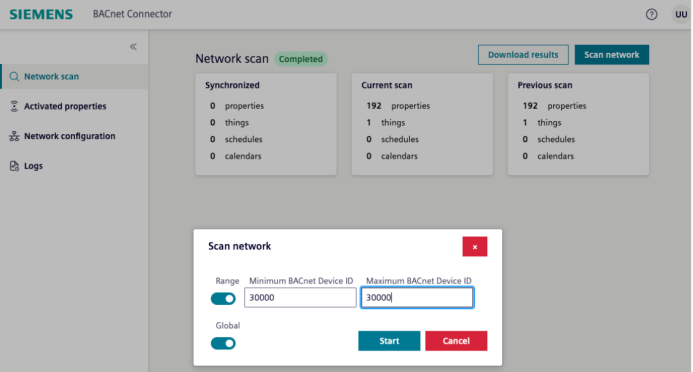
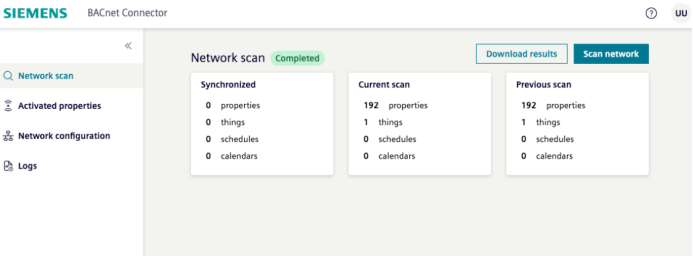
When the scan completes, the status changes to Completed. The Current scan results panel shows the number of discovered things and properties.
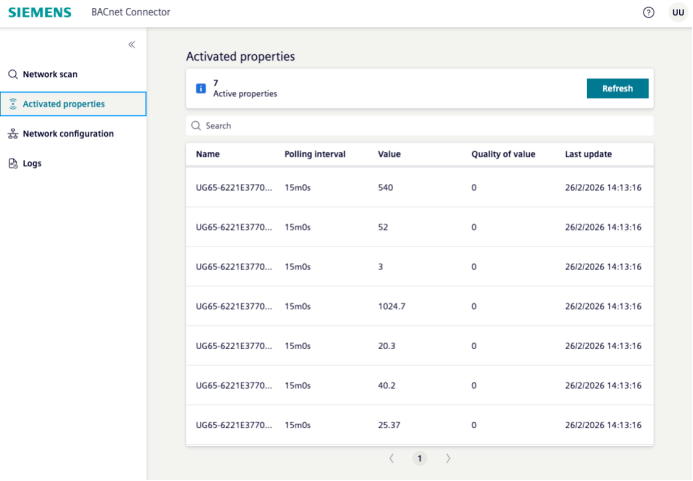
After activation in next steps, the Activated properties list will show the polling interval, current value, and last update time for each active property:
6. ONEconnectivity
Open the ONEconnectivity Management UI from the Remote access tab. Navigate to Things in the left menu.
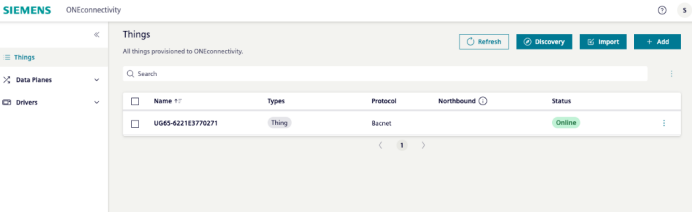
6.1 Things List
The UG65 BACnet gateway appears as a discovered Thing with Protocol = Bacnet and Status = Online.
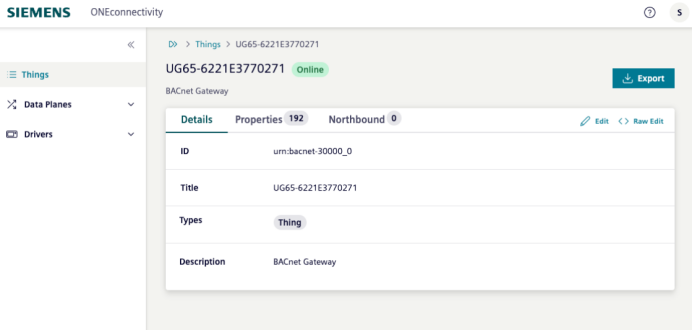
6.2 Thing Details
Click the thing name to open its detail view. The Details tab shows the BACnet ID and description.
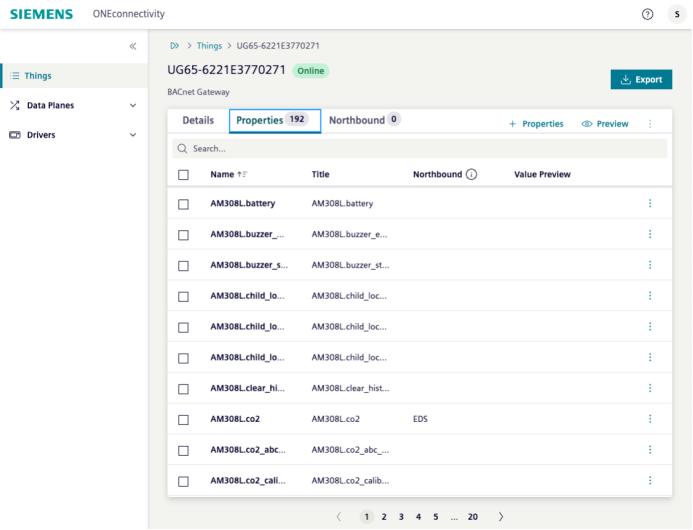
6.3 Properties
The Properties tab lists all 192 BACnet properties discovered from the UG65.
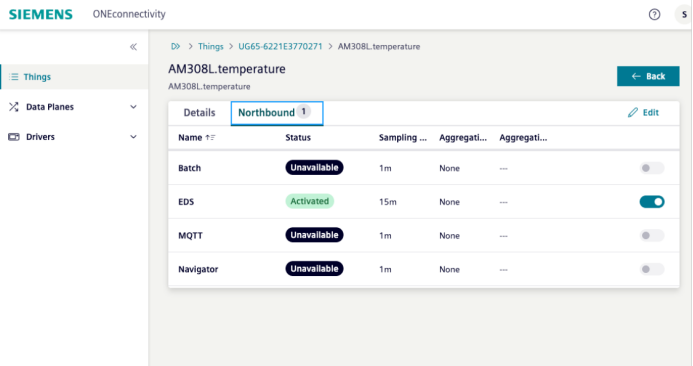
Click on an individual property (e.g., AM308L.temperature) to see its northbound data plane status and click to EDS toggle to send data to Building X:
6.4 EDS Data Plane Configuration
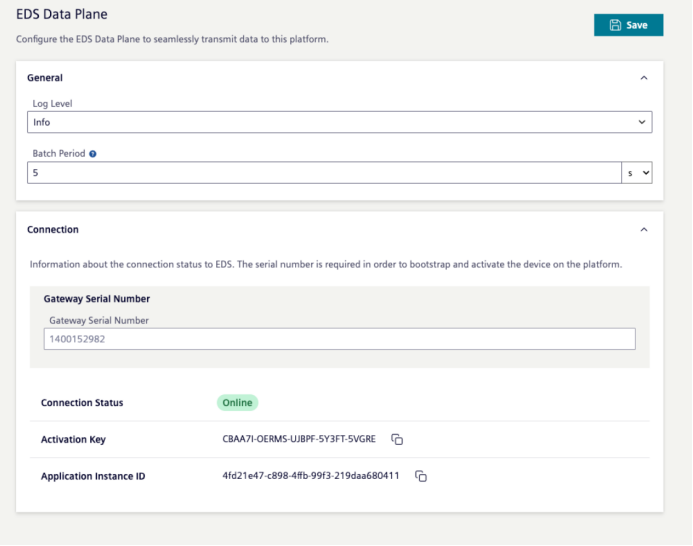
Navigate to Data Planes in the left menu to review or update the EDS Data Plane settings. The Connection Status should show Online, confirming the X500 is authenticated to Building X.
7. Building X: Data Setup App
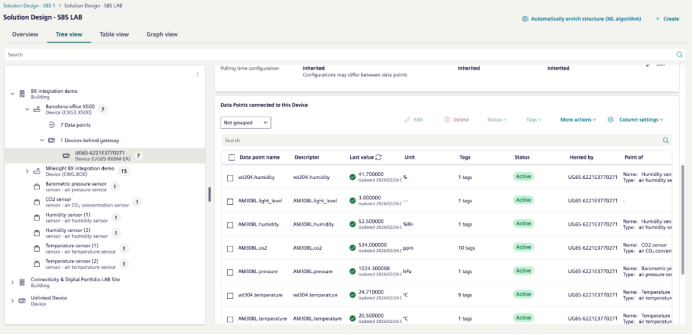
Open the Data Setup app in Building X. The X500 device can be found in Hierarchy tab on the selected partition.
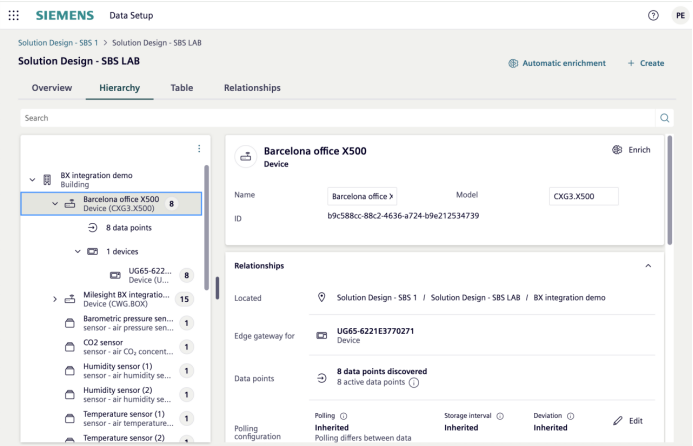
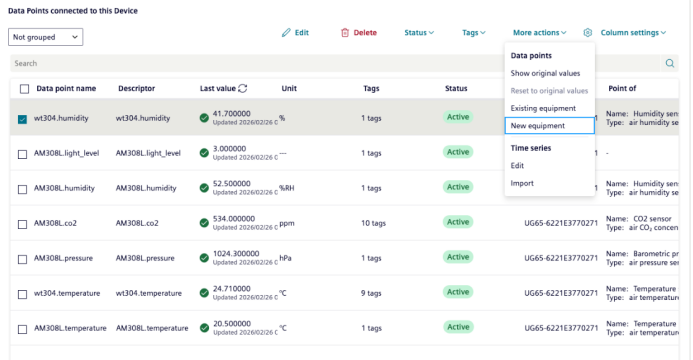
Select the X500 device to see all data points connected to it. The list shows data point names, last values, units, and active status for each sensor measurement.
Points need to be added to an equipment to be used in Building X. To add the point to a new equipment, select it and click “More actions” -> “Create piece of equipment”:
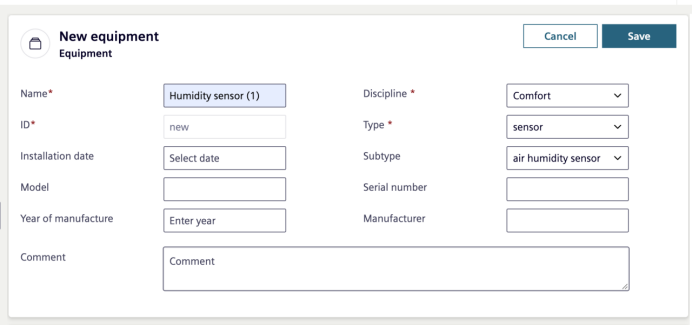
Select the type of equipment and relevant data, and click “Save”:
Click on any data point to view its full details, including unit, function, last value with timestamp, relationship to a Point of type (e.g., Temperature sensor), and time-series history.
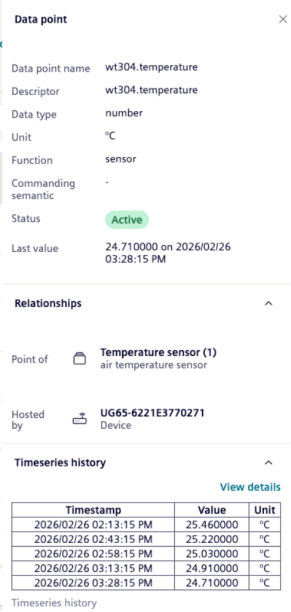
Once sensor data is available in Building X Data Setup and connected to an equipment, it can seamlessly flow into any Building X application.
Tip: Use the Automatically enrich structure (ML algorithm) button at the to let Building X automatically enrich data points.
8. Building X: Data Visualizer
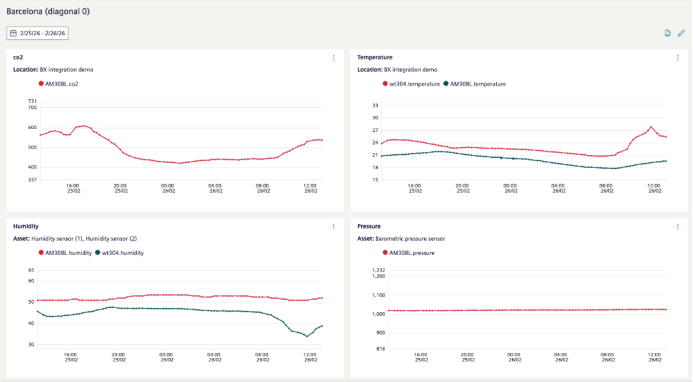
Open the Data Visualizer app to create dashboards from the sensor data. For example, add chart widgets and select data points from the Milesight sensors to visualize trends over time.
Disclaimer
This document is designed to facilitate the seamless integration of Siemens and Milesight products. The product operation interfaces and screenshots referenced herein are provided for illustrative purposes; actual content may vary depending on the specific software or firmware versions in use. Please note that Siemens and Milesight each offer technical support exclusively for their respective products. The scope of integration support remains subject to the individual support policies of each vendor. We hope this guide helps streamline your integration process and enhances your experience with both Siemens and Milesight solutions. This document is provided for informational purposes only. Neither Siemens nor Milesight shall be held liable for any direct or indirect damages resulting from the use of this document or the integration process. All product names, logos, and brands are property of their respective owners. Unauthorized use or reproduction of any content in this document is prohibited.
-END-
Was this article helpful?
That’s Great!
Thank you for your feedback
Sorry! We couldn't be helpful
Thank you for your feedback
Feedback sent
We appreciate your effort and will try to fix the article