TABLE OF CONTENTS
- Solution A : Siemens Building X - Milesight LoRaWAN sensor Integration via Connect Box
- 1. Siemens Connect Box -Milesight LoRaWAN sensor Integration
- 2. Siemens Building X - Milesight LoRaWAN sensor Integration
- Preface
- 1. Prerequisites
- 2. Configure Connect Box API Key
- 3. Log-in to Building X to add the devices.
- 4. Add the devices using API Key and Secret
- 5. Refresh to get the MQTT details
- 6. Configure the MQTT gateway in Connect Box.
- 7. Select the properties of Milesight Sensor for MQTT gateway
- 8. Refresh Building X and synchronize with Connect Box.
- 9. Set up the sensor data in Building X
- 10. Dashboard creation in Building X
- Solution B : Siemens Building X - Milesight LoRaWAN sensor Integration via Siemens Connect Gateways
Solution A : Siemens Building X - Milesight LoRaWAN sensor Integration via Connect Box
1. Siemens Connect Box -Milesight LoRaWAN sensor Integration
TABLE OF CONTENTS
- Preface
- 1. Prerequisites
- 2. Preparation
- 3. Log in to the Connect Box Platform
- 4. Create LoRaWAN Network Configuration
- 5. Add Milesight LoRaWAN Device
- 6. Check Data Status
Preface
The Connect Box, a product under Siemens, is an IoT building management solution designed specifically for small and medium-sized buildings. It simplifies device connectivity and data management. The device supports multiple communication protocols including LoRaWAN, BACnet IP, Modbus RTU/TCP, M-Bus, and KNX, enabling seamless integration with various Building Automation Systems (BAS) and existing equipment. Users can easily configure devices through the Connect Box web console and quickly deploy smart building applications using the embedded API.
The Connect Box features a simple installation process—typically completed within a day—and supports remote configuration and real-time data access, which helps enhance operational efficiency and energy management. Additionally, it is equipped with 4G communication and local data storage to ensure data reliability and security. For facility managers aiming to achieve digital transformation in their buildings, the Connect Box offers an efficient, flexible, and cost-effective solution.
This document introduces how to integrate Milesight sensors with the Connect Box gateway device, and how to observe the real-time data reported by the devices within the Connect Box platform.
In this demonstration, we use the Milesight AM307 sensor as an example. You may use your own Milesight device depending on your actual use case.
- Gateway Model: Connect Box CWG.BOX-XX (with a Connect Box cloud account)
- Sensor Model: AM307
2. Preparation
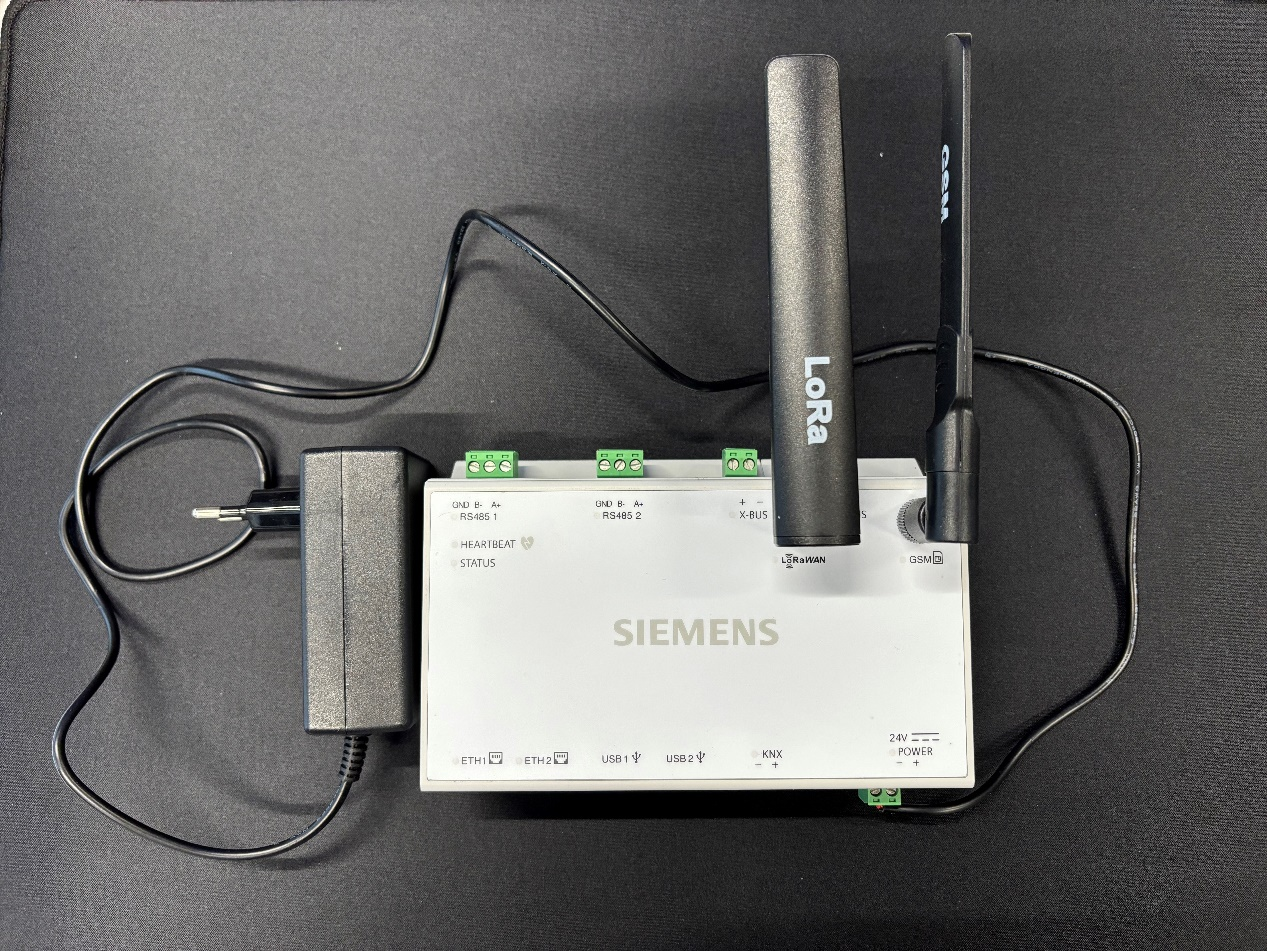
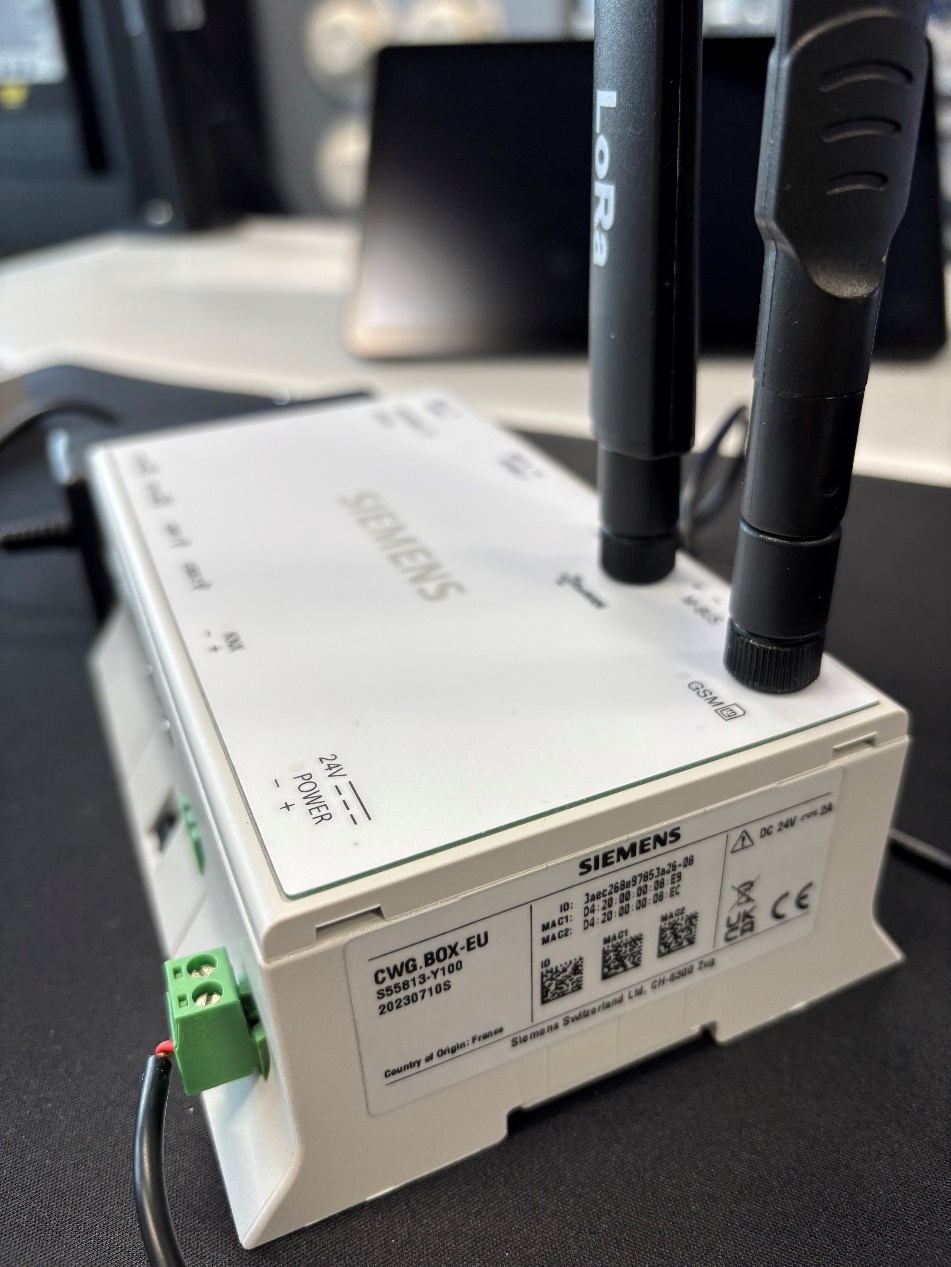
Prepare the Connect Box and make sure the 24V power supply is properly connected and that the antennas are securely attached, as pictures below.
3. Log in to the Connect Box Platform
Once the Connect Box is connected to the internet, it will automatically connect to the Connect Box cloud platform. Next, go to https://connectbox.siemens.com/ and search for the device using the recorded device ID. You should see your device as shown in the image below:

Tip: You can also use the "Map" function to help locate your device.
4. Create LoRaWAN Network Configuration
Navigate to: Configuration → Networks, then click “Add network” to create a new network configuration.

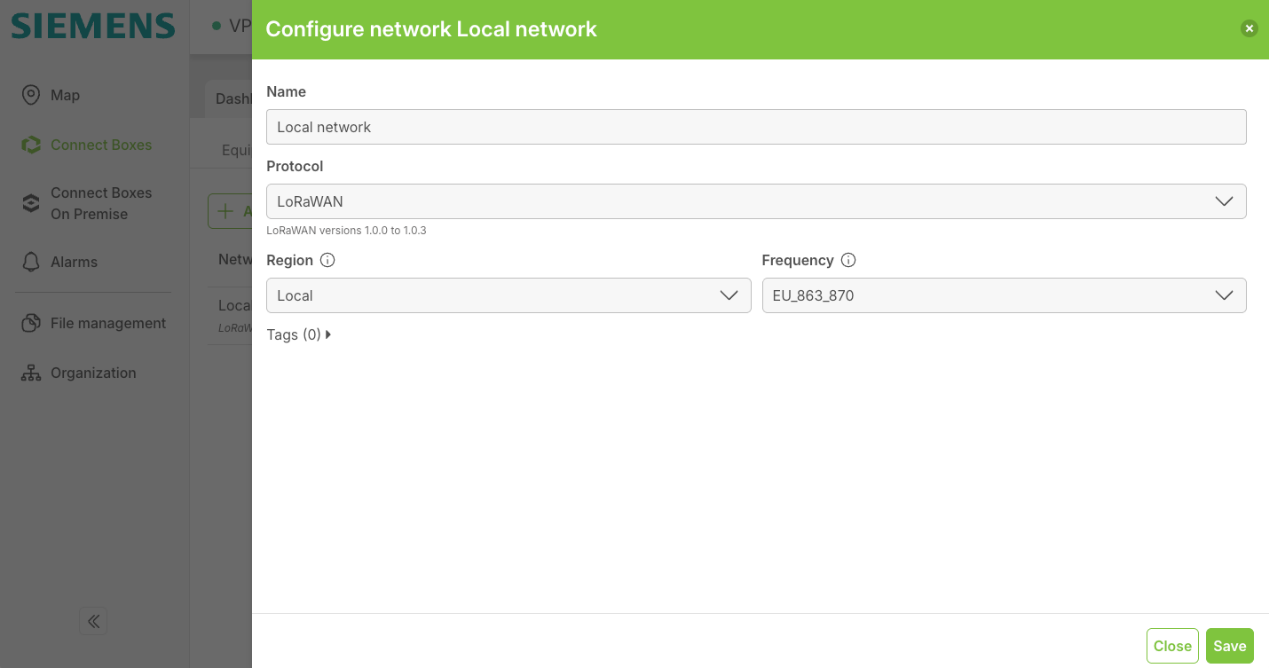
Make sure to select the correct frequency for your region.
Click Save when done.
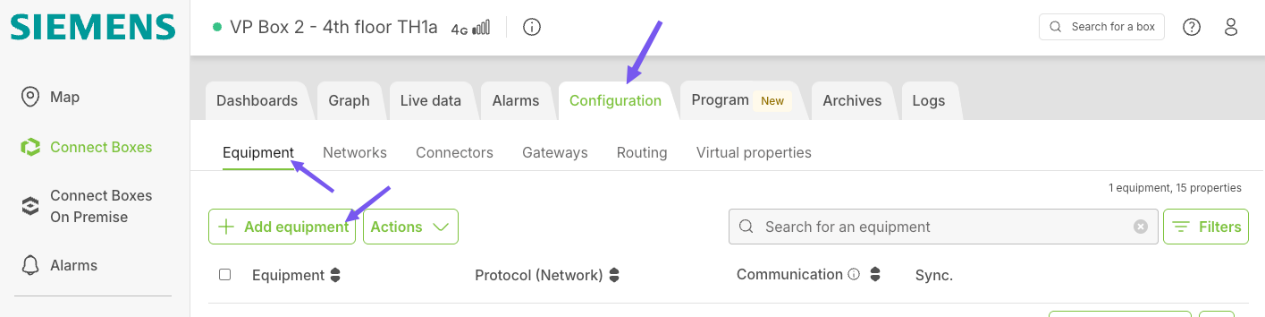
5. Add Milesight LoRaWAN Device
Navigate to: Configuration → Equipment, and click "Add equipment" as shown:
In the popup, select "Pick a decoded equipment":

Then, in the Manufacturer and product reference field, enter AM307.
The platform will automatically match the model:

Next, fill in the LoRa parameters of your AM307 sensor based on your actual device:
Below is the parameter mapping for reference. You should enter your own device’s parameters:


The default application key is 5572404c696e6b4c6f52613230313823 (sensor shipped before Q4 2025) or $EUI$EUI (for example: 24e124707e04392324e124707e043923)
Tip: You can find Milesight device parameters in the settings via Milesight Toolbox.
Click the Next button in the bottom-right corner to proceed.
On the next screen, configure and add the Properties parameters, then click Save, as shown below:

At this point, the AM307 has been successfully added. After a short wait, the device will automatically join the network, and the platform will display its status as shown:

Next, you need to push all the configuration parameters from the cloud to your physical device by clicking Save changes → Send to the box in the bottom right corner.


The device should be marked as paired (if not, you may need to refresh the screen).
6. Check Data Status
Follow the operation shown in the image:

Here, you can see that the cloud platform is now receiving real-time data reported by AM307. This concludes the integration process.
2. Siemens Building X - Milesight LoRaWAN sensor Integration
TABLE OF CONTENTS
- Preface
- 1. Prerequisites
- 2. Configure Connect Box API Key
- 3. Log-in to Building X to add the devices.
- 4. Add the devices using API Key and Secret
- 5. Refresh to get the MQTT details
- 6. Configure the MQTT gateway in Connect Box.
- 7. Select the properties of Milesight Sensor for MQTT gateway
- 8. Refresh Building X and synchronize with Connect Box.
- 9. Set up the sensor data in Building X
- 10. Dashboard creation in Building X
Siemens Building X™ is a platform that runs the applications that help you manage building operation. It provides a central foundation for secure, real-time data that supports a wide range of use cases. As a part of the Siemens Xcelerator portfolio, Building X aims to provide a unified platform for building operations by integrating data from various systems.
Milesight provides a broad portfolio of sensors and edge devices for smart buildings. Milesight hardware can be easily integrated with the Siemens Building X platform, enabling fast deployment of data-driven use cases.
This document describes the integration in detail and walks you through the required steps to connect Milesight LoRaWAN sensors to Siemens Building X cloud platform.
Topology (simple): Milesight LoRaWAN sensor → Siemens Connect Box → Siemens Building X Platform
Before starting the integration, ensure you have the following components and accounts prepared:
- Sensor Model: Milesight IAQ Sensor AM319 (used as an example)
- Gateway: Siemens Connect Box
- Connect Box License: either on-premises or cloud license
- Siemens Building X Account: You need an account with Application engineer role for accessing to Building X Data Setup app, and an active subscription to access the Devices and Data Visualizer apps
Before proceeding, make sure you have completed the Milesight sensor onboarding (link) process for the Siemens Connect Box. Refer to the dedicated onboarding guide for detailed instructions.
Additionally:
- Ensure the Siemens Connect Box is powered on and connected to the network.
- Confirm that the device is visible and online.
2. Configure Connect Box API Key
Login to the Connect Box console with your account.

Navigate to Organization → API Keys.
You will need to create a service account for the first time.
Click Create service account:

Input the Prefix (name) and description.
Under Organizations permissions, select Organization Admin as the permissions and save it.

Click to create the API Key, it will be used in the Building X platform.


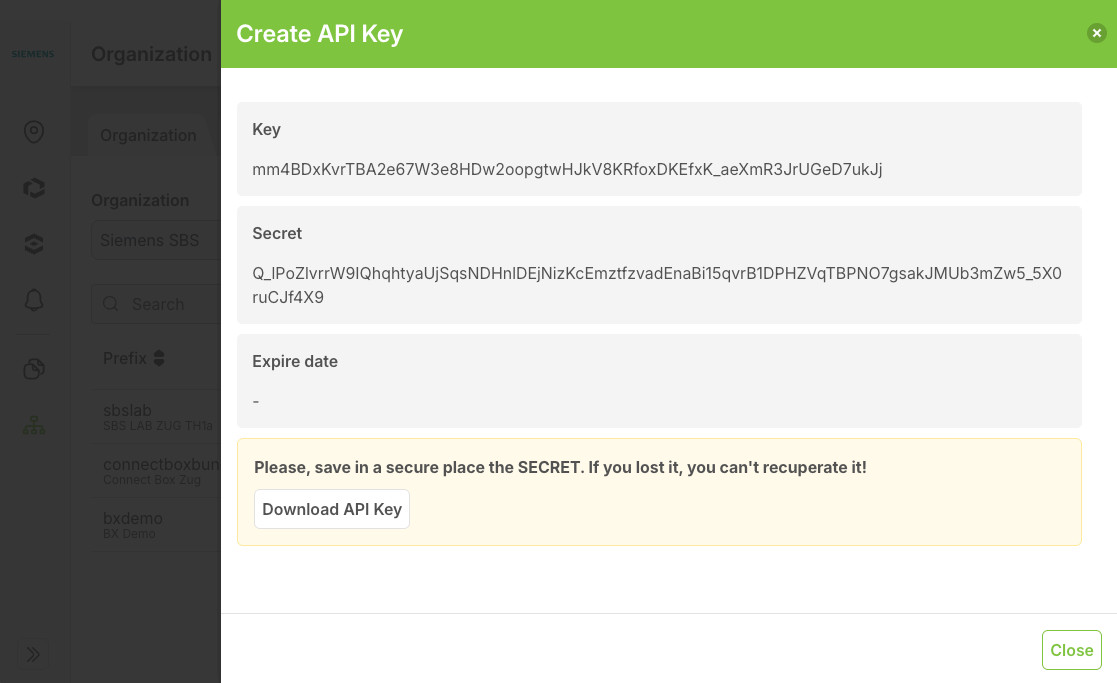
The created API Key and the Secret will be used in the following steps.
3. Log-in to Building X to add the devices.
Log-in to the Building X platform with your account.

When done, you can see the Account, Devices and Data Setup apps.

4. Add the devices using API Key and Secret
Click Devices app to load the site of device management page.
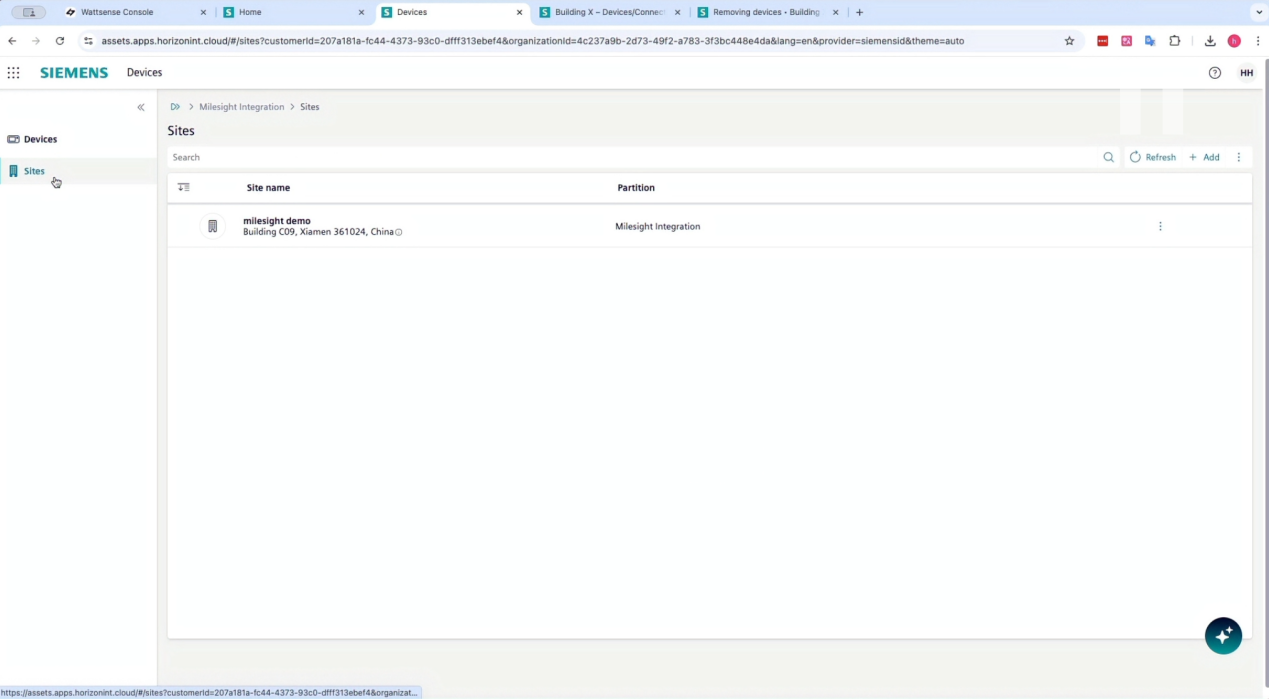
Click Add in the top right corner in the Sites tab to add the device, and select Without activation key option.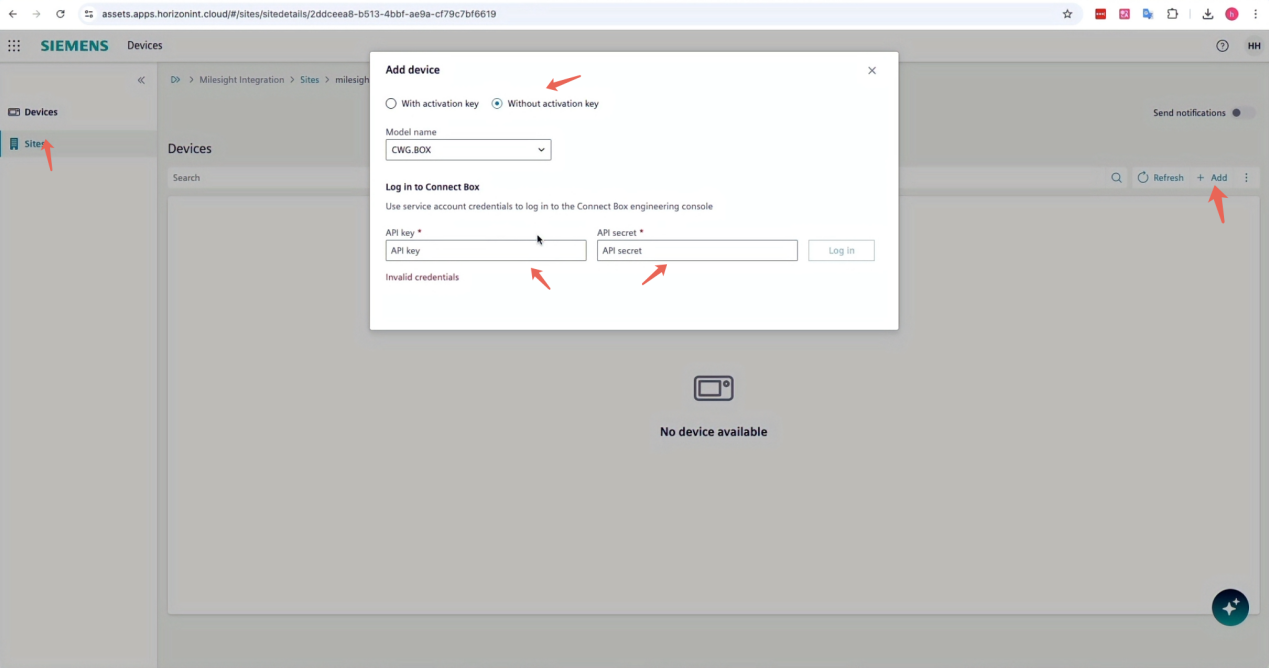
Copy and paste the API Key and API Secret here we created in Step 2. Then click Log in.
Click Add again to load the device.

The device is added successfully.
5. Refresh to get the MQTT details
Refresh the page to load the MQTT details of this device.
You will need to click Download to download the TLS credentials.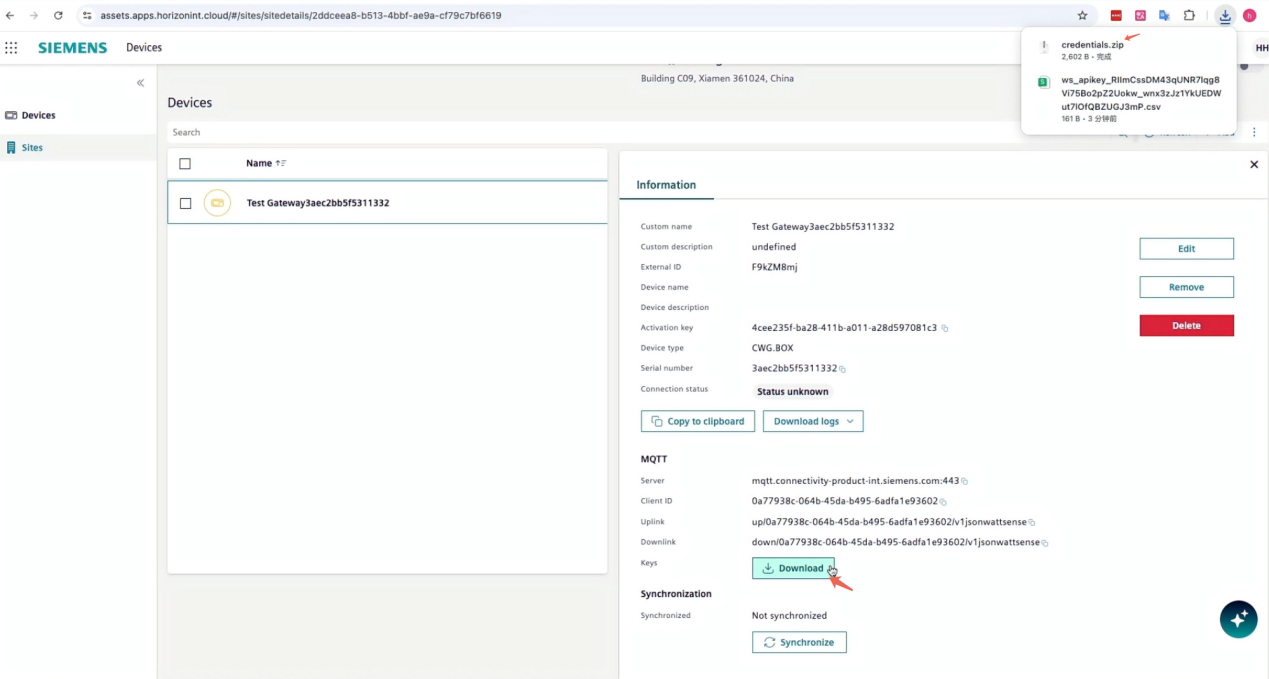
This information will be used in the Next Step.
6. Configure the MQTT gateway in Connect Box.
Navigate to Connect Boxes → Configuration → Gateways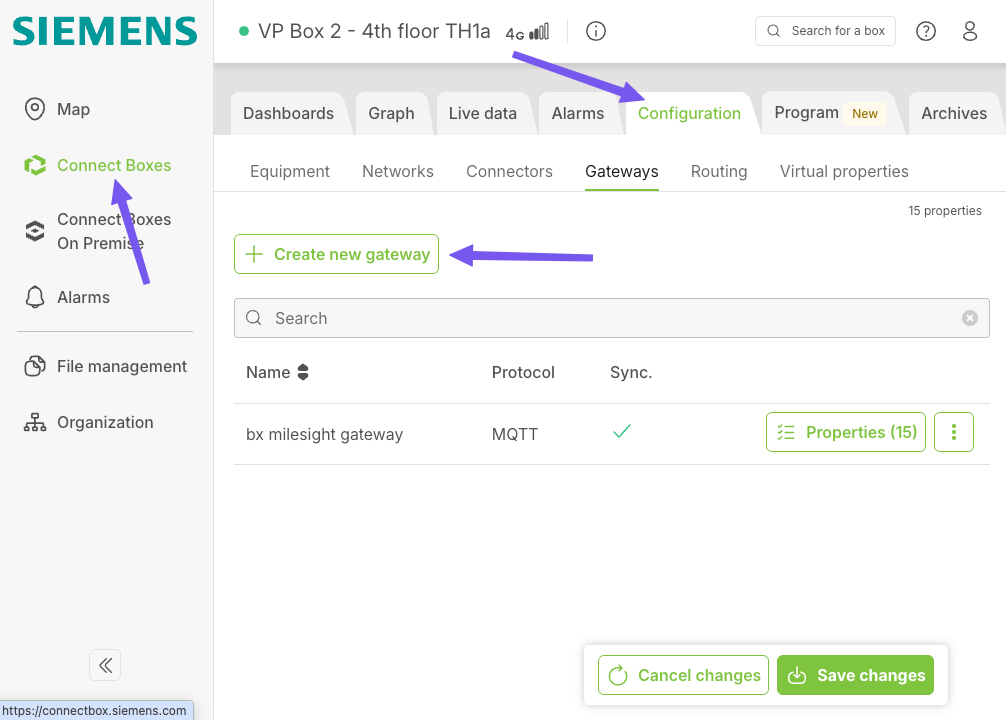
Then click Create new gateway, it will be used to transfer the sensor data to the external application servers.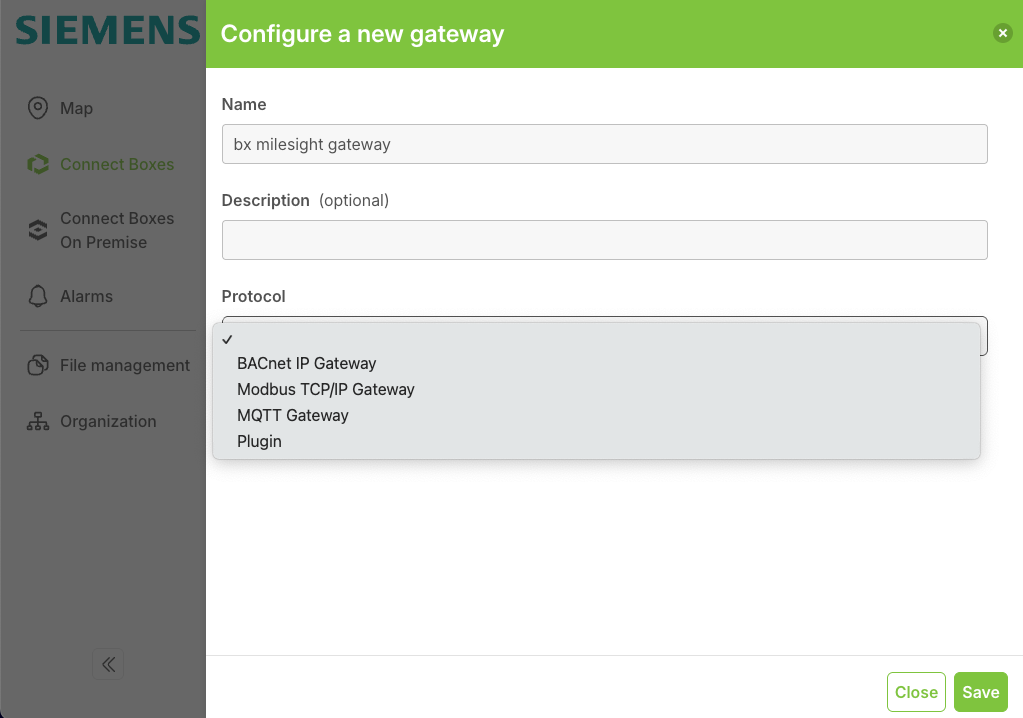
Copy and paste the MQTT server host, client ID, uplink and downlink topic from the previous step.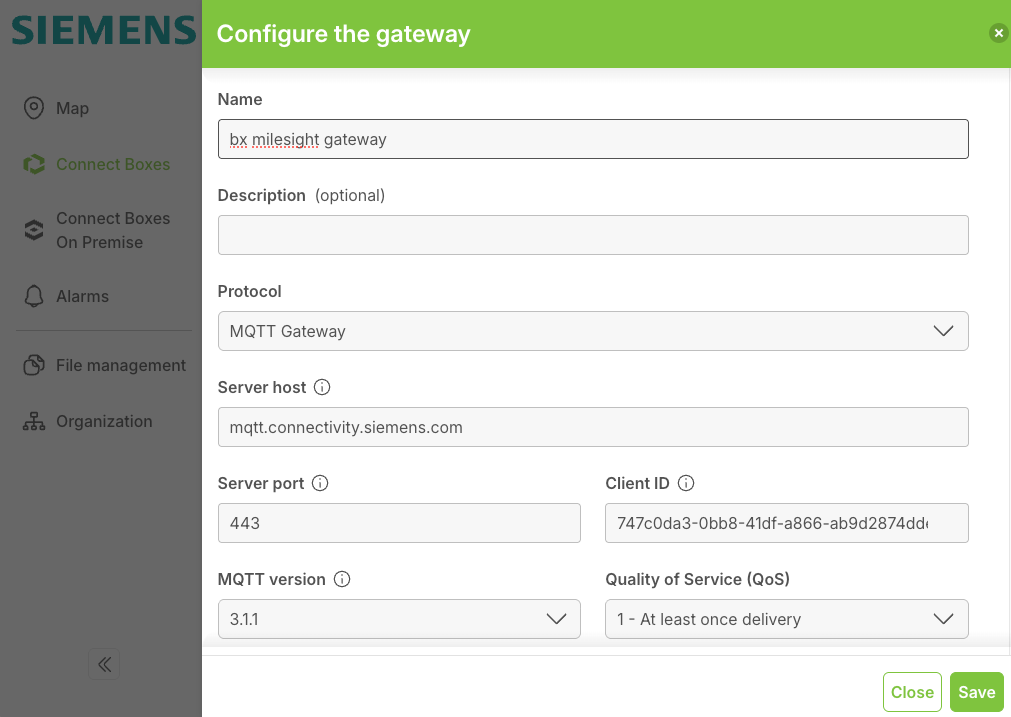
To enable the TLS certificate, upload the credential files one by one.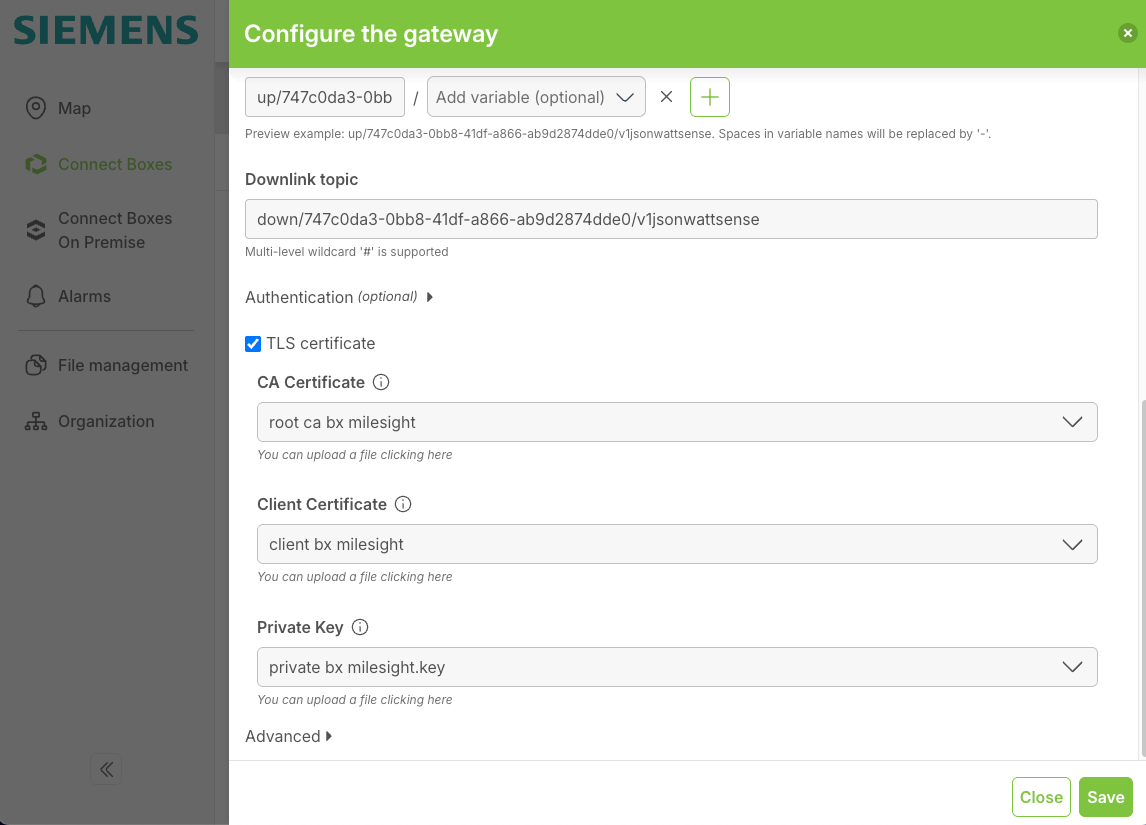
Choose the File type and the File visibility correctly. Then save it.
Save the changes.
7. Select the properties of Milesight Sensor for MQTT gateway
Click Properties to choose which sensor data are forwarded.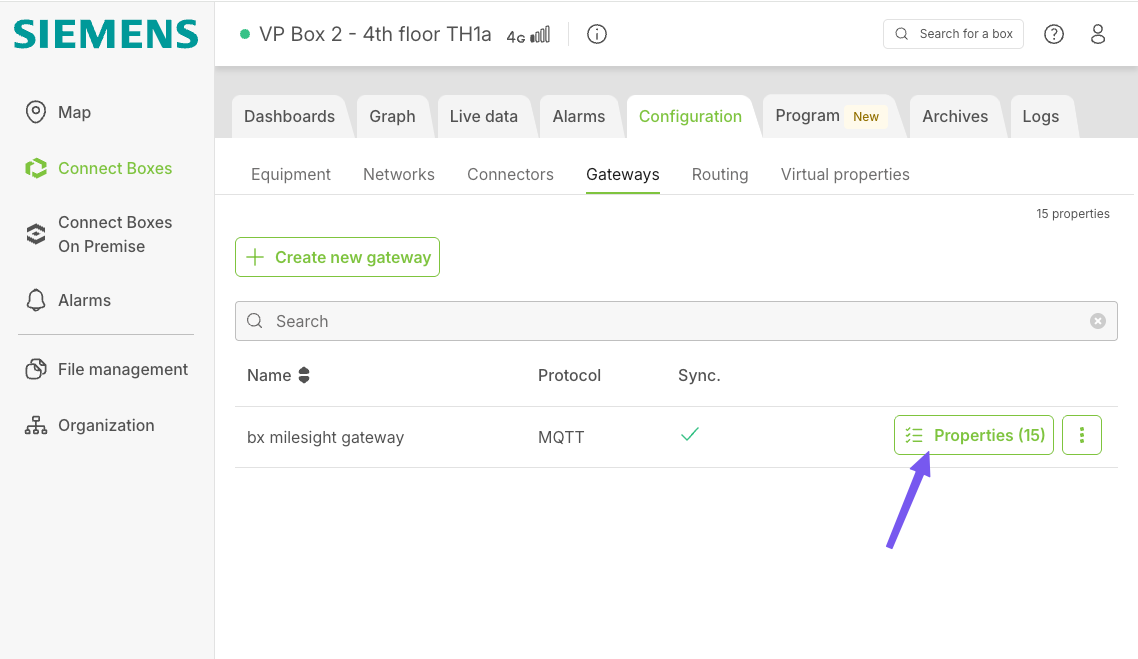
Click Add Property option.
Locate to the Milesight AM319 IAQ Sensor.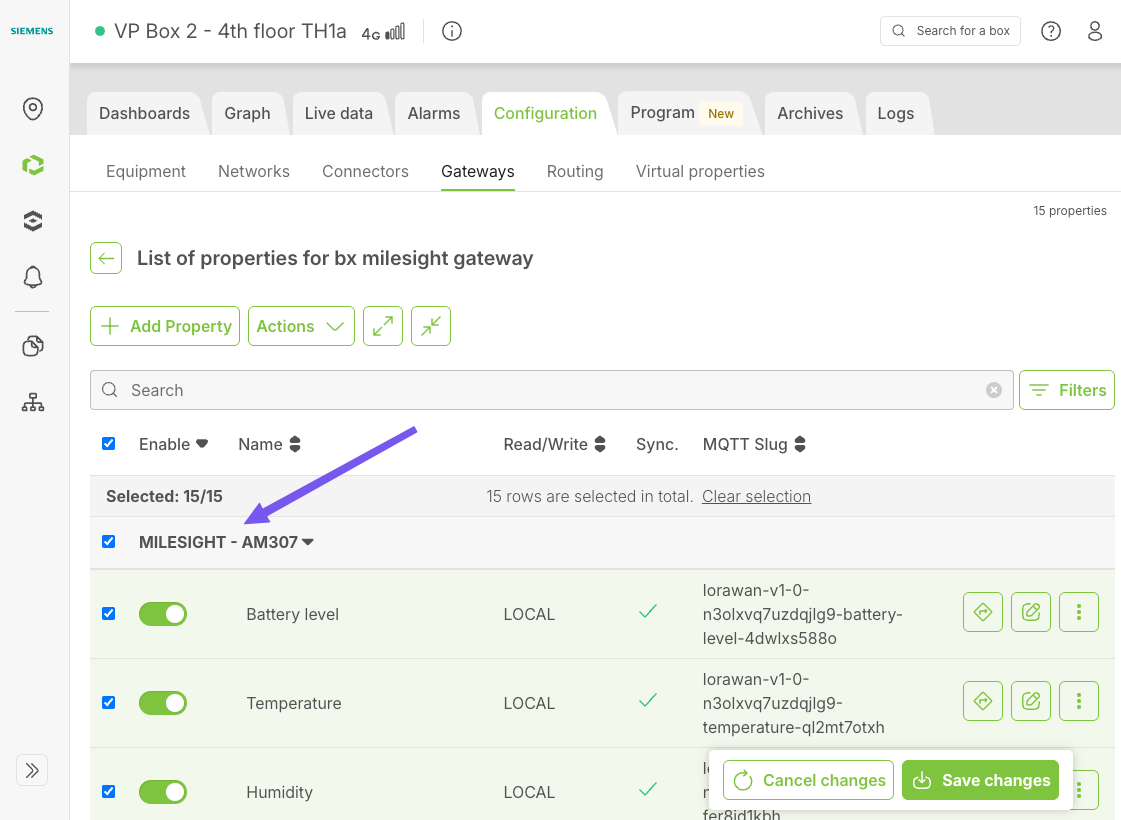
Click “Save changes” and click “Send to the box” and it will sync to the Connect Box locally.
All the configurations at Connect Box side are finished.
8. Refresh Building X and synchronize with Connect Box.
Let's refresh Building X website to get the latest Connection Status.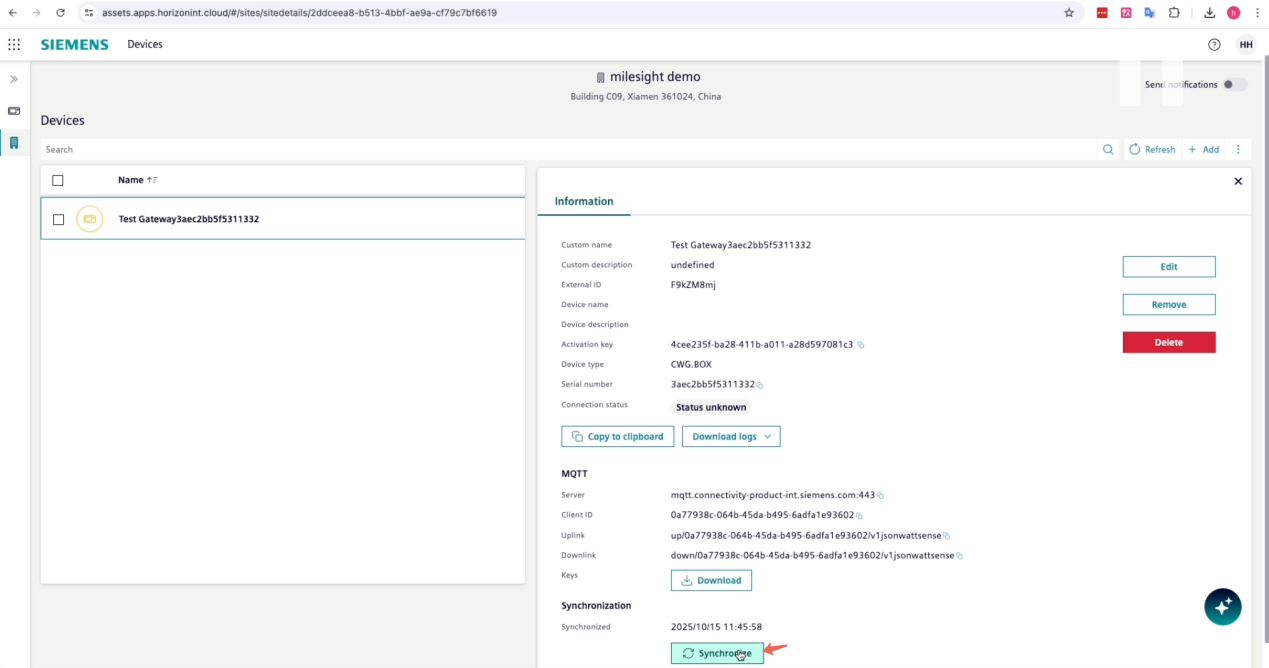
The device is Online now.
9. Set up the sensor data in Building X
Navigate to Data Setup app in Building X.
Click Hierarchy tab.
Choose the Device and the Data points enabled.
Start to explore the Milesight Sensor data in Building X platform.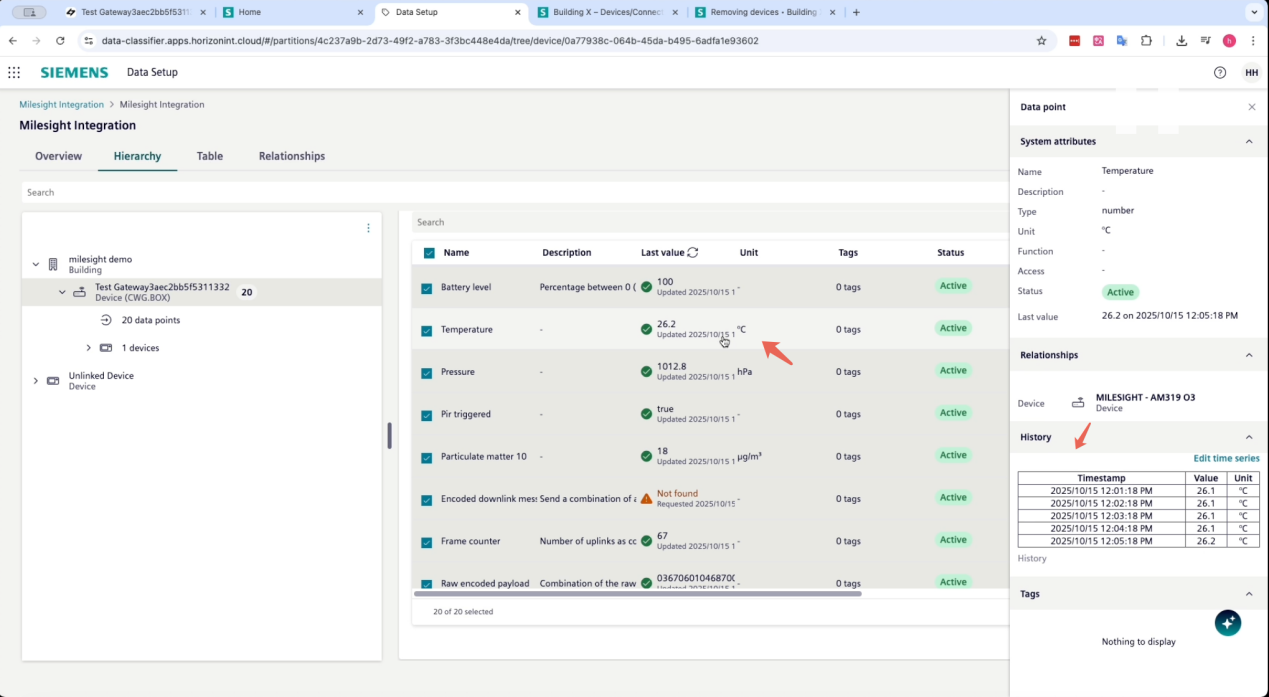
10. Dashboard creation in Building X
Now, you can freely use the data points coming from Milesight sensor to Building X and create dashboards within Building X as an example below (Example below show Milesight indoor air quality data visualized with Building X Data Visualizer App). For this, refer to our Building X technical training videos and documentation.

Solution B : Siemens Building X - Milesight LoRaWAN sensor Integration via Siemens Connect Gateways
TABLE OF CONTENTS
- Preface
- 1. Prerequisites
- 2. Milesight UG65 Gateway Configuration
- 3. Register the UG65 in the Milesight Development Platform (Optional)
- 4. Set Up the Siemens X500 in Building X
- 5. Configure the BACnet Connector
- 6. ONEconnectivity
- 7. Building X: Data Setup App
- 8. Building X: Data Visualizer
Preface
This guide describes how to integrate Milesight LoRaWAN sensors with the Siemens Building X platform using a Milesight UG65 LoRaWAN gateway and a Siemens Connect Gateway. The guide uses the X500 device as an example, but the same process can be applied to X200 and X300 devices.
The UG65 acts as both the LoRaWAN network server for the sensors and a BACnet/IP device server that exposes sensor data over the local network. The X500 gateway runs the BACnet Connector and ONEconnectivity applications, which discover and relay the BACnet data to the Building X cloud platform.
Data flow:
Milesight LoRaWAN sensor → Milesight UG65 (LoRaWAN Network Server + BACnet/IP Server) → Siemens X500 (BACnet Connector → ONEconnectivity → EDS Data Plane) → Siemens Building X (Data Setup → Data Visualizer).
- Milesight UG65 LoRaWAN gateway, connected to the same LAN as the X500.
- One or more Milesight LoRaWAN sensors (this guide uses an AM308L and a WT304 as examples).
- Siemens edge gateway (such as CXG3.X500) registered and online in Building X.
- Building X subscription with Data Setup and Devices applications.
- Milesight Development Platform account (for device management; optional but recommended).
2. Milesight UG65 Gateway Configuration
2.1 Verify Network Connectivity
Enable Wireless Network Connection on your computer and search for access point Gateway_XXXXXX(=last 6 digits of WLAN MAC address) to connect it, the default Wi-Fi
password is iotpassword.
Open a Web browser on your PC (Chrome is recommended) and type in the IP address https://192.168.1.1 to access the web GUI. Navigate to Status > Network and confirm that the WAN interface (eth 0) has received a valid DHCP address on the local network.
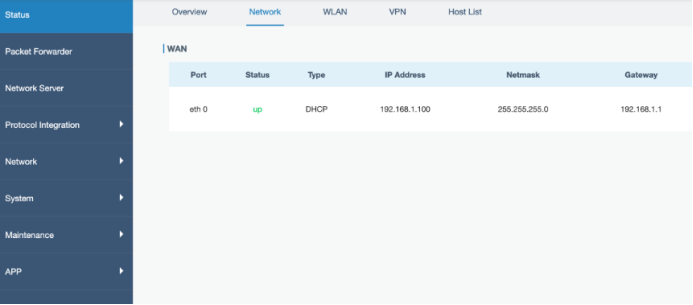
Go to Network > Port to review or change the WAN port settings. The default configuration uses DHCP Client, which is suitable for most installations.
 Note: Make sure the UG65 and the X500 are on the same IP subnet so that BACnet/IP communication works without routing.
2.2 Configure the LoRaWAN Network Server
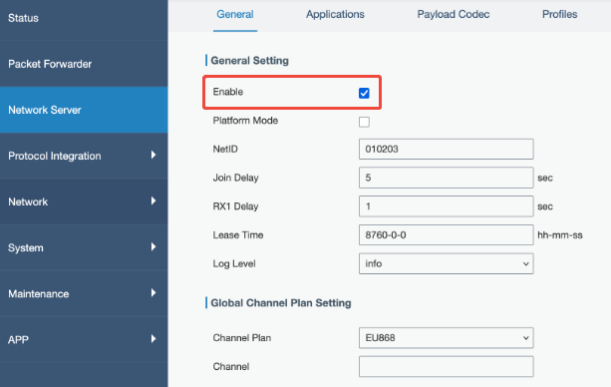
Navigate to Network Server > General and enable the built-in LoRaWAN Network Server. Set the appropriate channel plan for your region (EU868 in this example).
2.3 Create Application
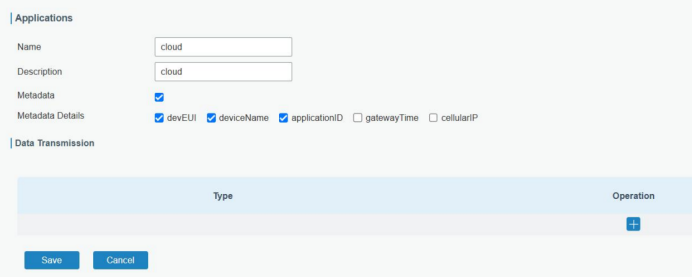
Navigate to Network Server > Applications and create an application for device in the same collection.
2.4 Configure the BACnet Server
The UG65 exposes sensor data as BACnet objects over BACnet/IP. Navigate to Protocol Integration > BACnet Server > Server tab and configure as follows:
Field | Value |
Enable | Checked |
Network Type | BACnet/IP |
UDP Port | 47808 |
Device ID | 30000 |
Device Name | UG65-6221E3770271 (or your gateway serial number) |
BBMD | Unchecked (same subnet as X500) |
Global Object | Checked |
Global Object Details | status, frequency, rssi, snr, datarate, frame_count |
Automatically Add Objects | Checked |
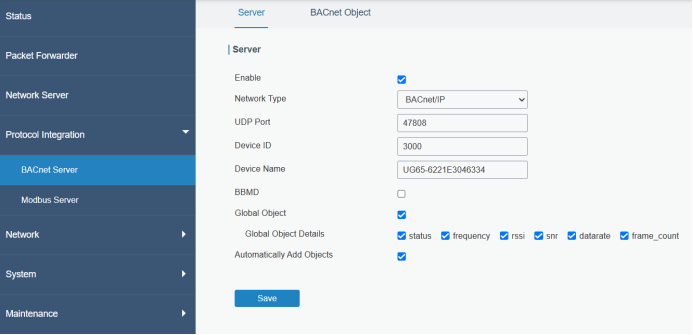
After adding all sensors, the Device tab shows each device with its status. Wait for sensors to join the network (Status = Online).
Tip:
The UG65 includes a built-in Payload Codec Library. Navigate to Network Server > Payload Codec and click Obtain to download the latest codecs (requires internet access). Codecs for all standard Milesight devices are included.
2.5 Add LoRaWAN Sensors
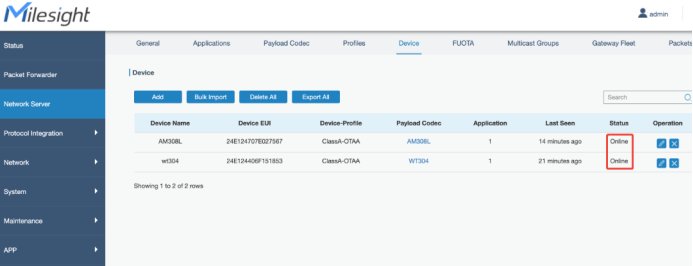
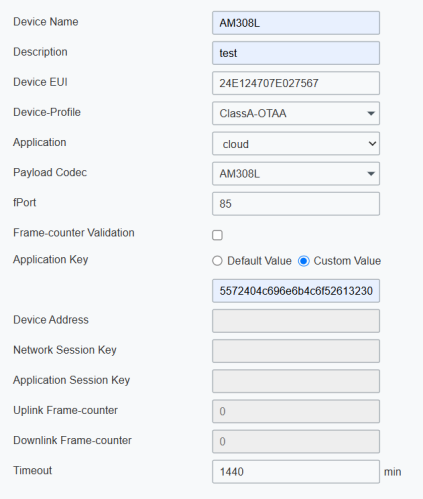
Go to Network Server > Device and click Add to register each sensor. The example below shows an AM308L 8-in-1 indoor air quality sensor.
Device Name | AM308L |
Device EUI | 24E124707E027567 |
Device Profile | ClassA-OTAA |
Application | cloud (the one you just created) |
Payload Codec | AM308L |
fPort | 85 (default fPort for Milesight sensor is 85) |
Application Key | Match with the sensor application key |
Click Save. Then open the BACnet Object tab to verify that BACnet object groups have been created automatically for each registered sensor.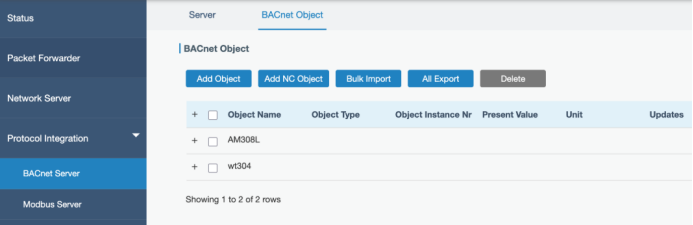
Note: Each sensor generates multiple BACnet Analog Input objects — one per measurement channel (temperature, humidity, CO₂, etc.). The total for two devices in this example is 192 BACnet properties.
3. Register the UG65 in the Milesight Development Platform (Optional)
For centralized device management, the UG65 can be registered in the Milesight Development Platform at console.milesight.com. This allows remote configuration and firmware updates.
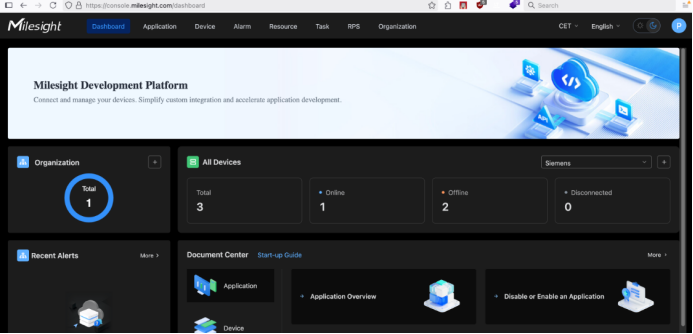
Follow this article to add your gateway to platform. Connect a Device
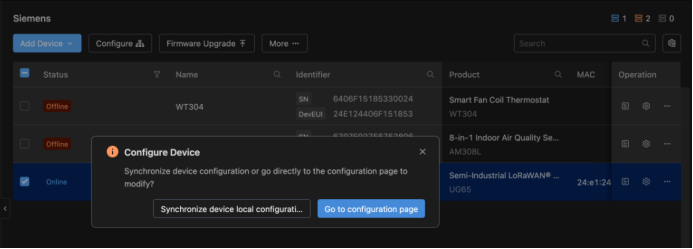
From the Device menu, select the UG65 and click Configure. When prompted, choose Go to configuration page to open the gateway's local web UI through the platform tunnel, or choose Synchronize device local configuration to push settings.
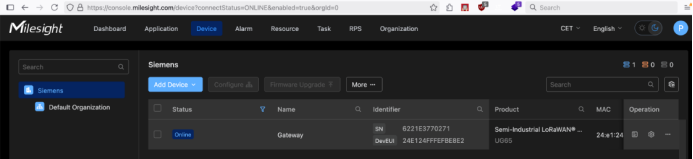
Once registered and online, the UG65 appears in the device list with Status = Online.
4. Set Up the Siemens X500 in Building X
4.1 Verify the X500 is Registered and Online
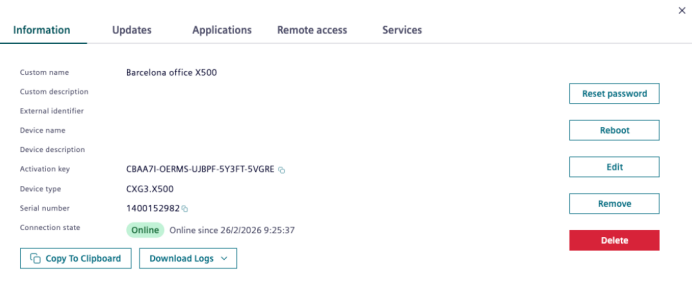
Log in to Building X and open the Devices app. Locate your X500 gateway in the device list. In our example, the device type is CXG3.X500.
 Click the device to open its details. On the Information tab, confirm that Connection state is Online.
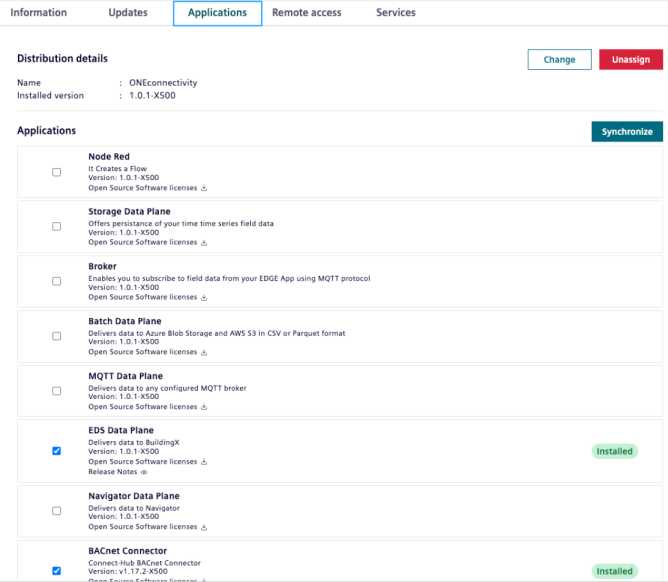
4.2 Verify Installed Applications
Open the Applications tab. Confirm that both EDS Data Plane and BACnet Connector are installed (shown with a green Installed badge). If not installed, check the appropriate checkboxes and click Synchronize.
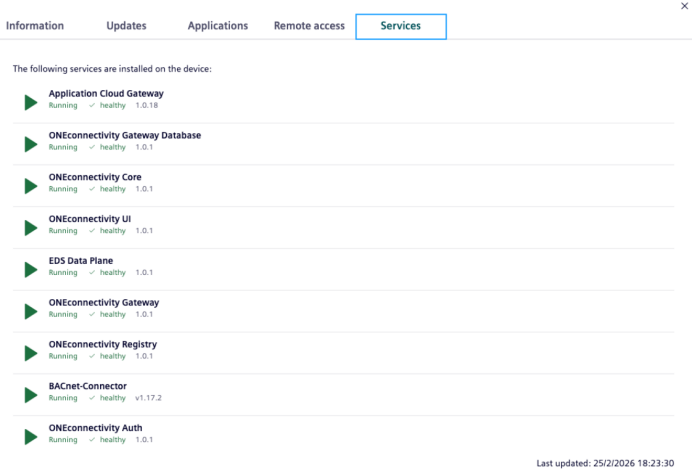
4.3 Verify Services are Running
Open the Services tab. All services should show status Running with a healthy indicator. Key services for this integration are EDS Data Plane, BACnet-Connector, and the ONEconnectivity services.
4.4 Access Remote UIs
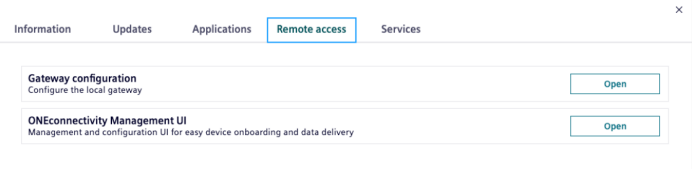
Open the Remote access tab. Two tunnels are available:
- ONEconnectivity Management UI – for reviewing discovered things and data plane configuration
- Gateway configuration – the X500 local admin UI
Click Open next to each service to access it through the Building X secure tunnel.
5. Configure the BACnet Connector
Open the Gateway configuration remote access link (or navigate to the X500 device page and select the BACnet Connector). The BACnet Connector UI opens at SIEMENS > BACnet Connector.
5.1 Configure the BACnet Network Port
Go to Network configuration in the left menu. If no network is configured, click the + button to add one. If one exists, click the edit (pencil) icon to review the settings.
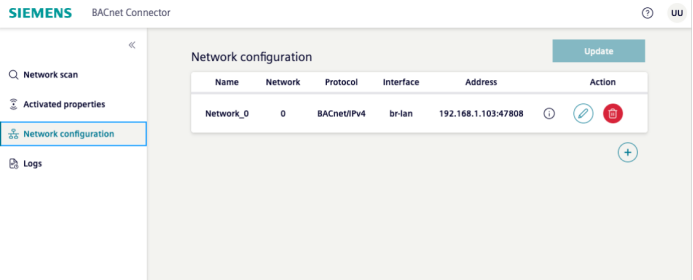
In the Update network configuration dialog, set the Network port section as follows:
Field | Value |
Name | Network_0 |
Protocol | BACnet/IPv4 |
Network number | 0 |
Network adapter | br-lan |
IP address | 192.168.1.103/24 (X500 LAN IP) |
UDP port | 47808 |
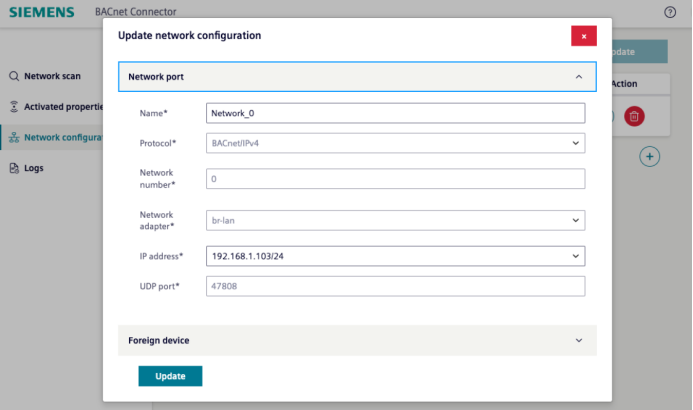
Click Update to save, then click the Update button on the Network configuration page to apply the changes.
5.2 Scan the Network
Go to Network scan in the left menu and click Scan network. In the dialog, enable Range and set both the minimum and maximum BACnet Device ID to 30000 (matching the Device ID configured on the UG65 BACnet Server). Enable Global to broadcast the scan across the network, then click Start.

When the scan completes, the status changes to Completed. The Current scan results panel shows the number of discovered things and properties.
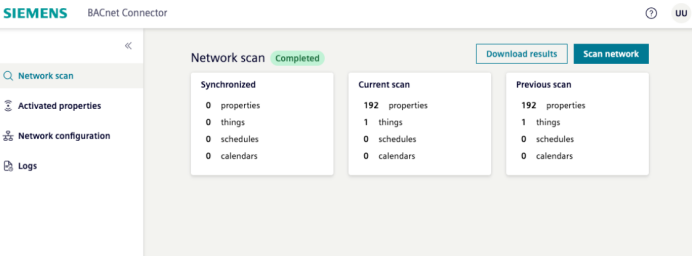
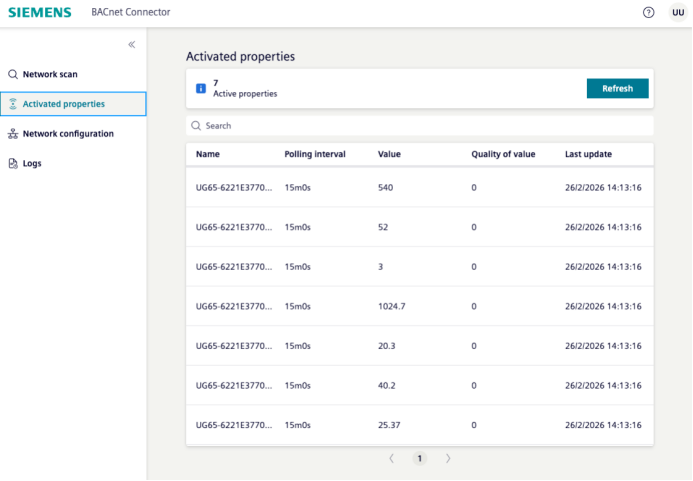
After activation in next steps, the Activated properties list will show the polling interval, current value, and last update time for each active property:
6. ONEconnectivity
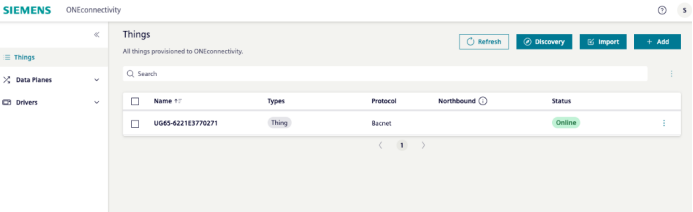
Open the ONEconnectivity Management UI from the Remote access tab. Navigate to Things in the left menu.
6.1 Things List
The UG65 BACnet gateway appears as a discovered Thing with Protocol = Bacnet and Status = Online.
6.2 Thing Details
Click the thing name to open its detail view. The Details tab shows the BACnet ID and description.

6.3 Properties
The Properties tab lists all 192 BACnet properties discovered from the UG65.
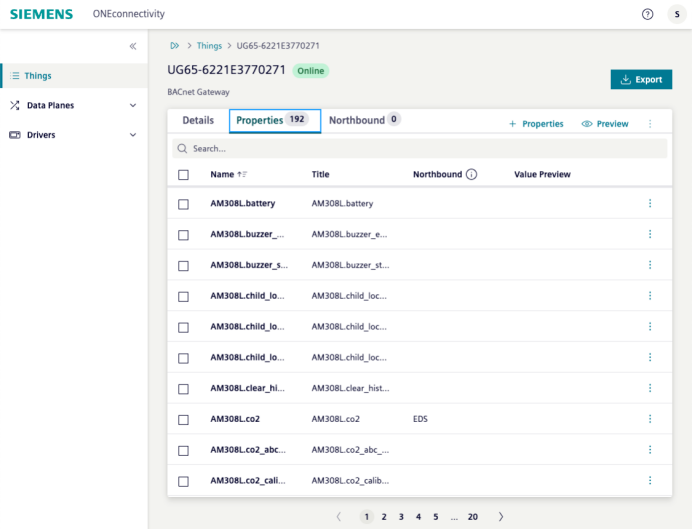
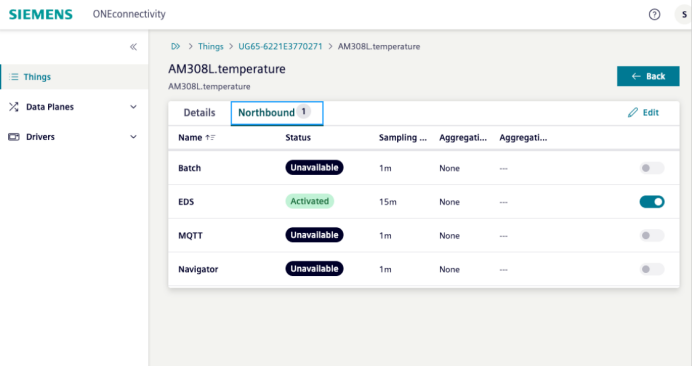
Click on an individual property (e.g., AM308L.temperature) to see its northbound data plane status and click to EDS toggle to send data to Building X:
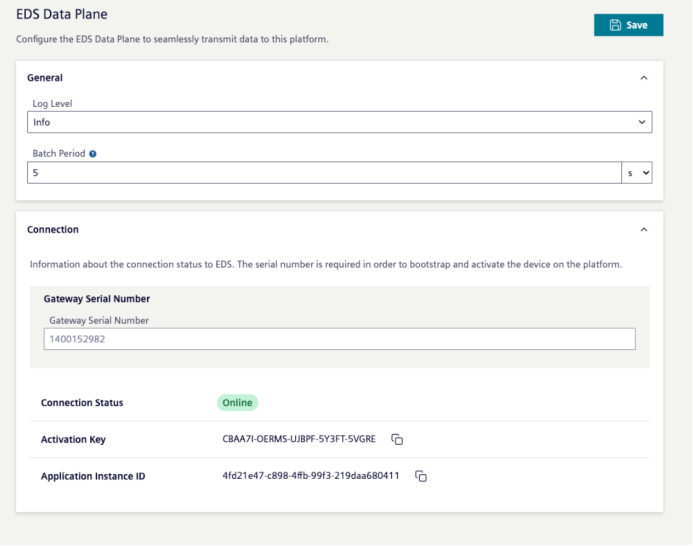
6.4 EDS Data Plane Configuration
Navigate to Data Planes in the left menu to review or update the EDS Data Plane settings. The Connection Status should show Online, confirming the X500 is authenticated to Building X.
7. Building X: Data Setup App
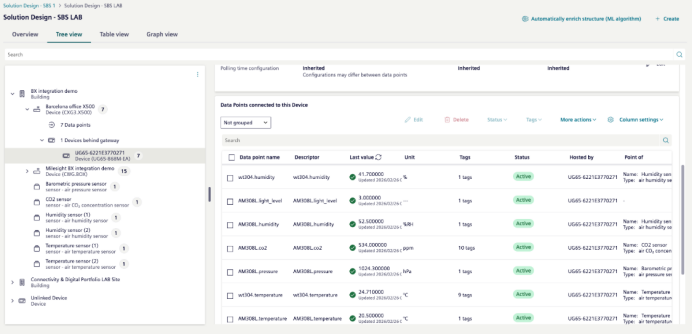
Open the Data Setup app in Building X. The X500 device can be found in Hierarchy tab on the selected partition.
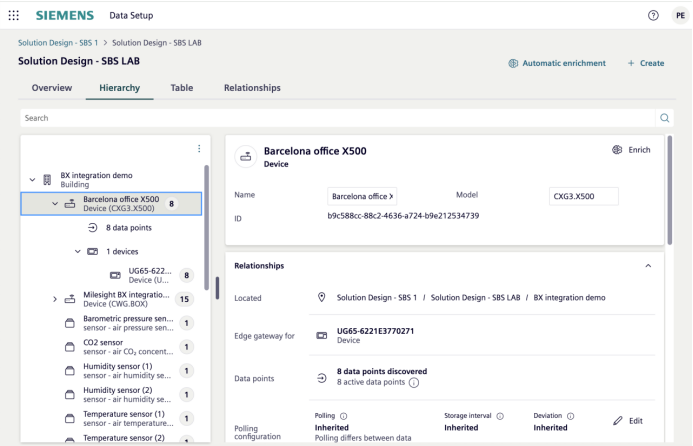
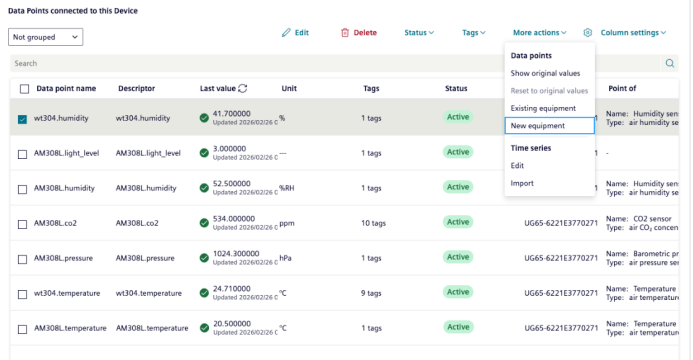
Select the X500 device to see all data points connected to it. The list shows data point names, last values, units, and active status for each sensor measurement.
Points need to be added to an equipment to be used in Building X. To add the point to a new equipment, select it and click “More actions” -> “Create piece of equipment”:
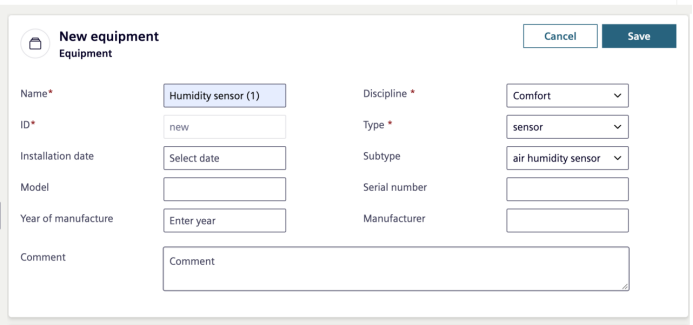
Select the type of equipment and relevant data, and click “Save”:
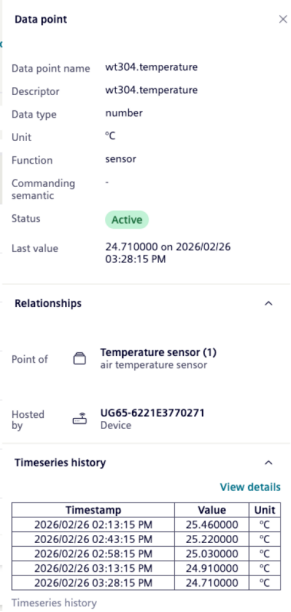
Click on any data point to view its full details, including unit, function, last value with timestamp, relationship to a Point of type (e.g., Temperature sensor), and time-series history.
Once sensor data is available in Building X Data Setup and connected to an equipment, it can seamlessly flow into any Building X application.
Tip: Use the Automatically enrich structure (ML algorithm) button at the to let Building X automatically enrich data points.
8. Building X: Data Visualizer
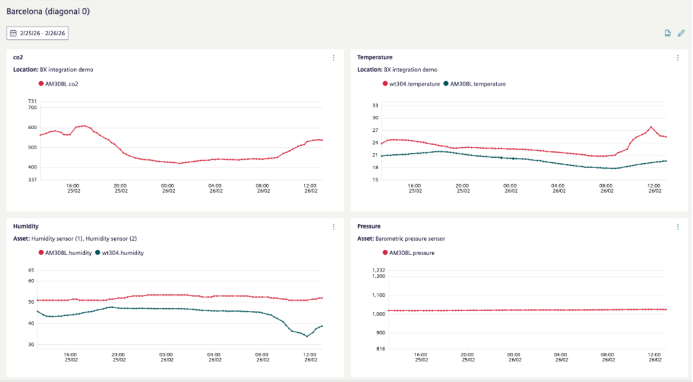
Open the Data Visualizer app to create dashboards from the sensor data. For example, add chart widgets and select data points from the Milesight sensors to visualize trends over time.
-END-
Was this article helpful?
That’s Great!
Thank you for your feedback
Sorry! We couldn't be helpful
Thank you for your feedback
Feedback sent
We appreciate your effort and will try to fix the article