Description
Milesight routers has equipped with GPS feature and provides two ways to get GPS data: IP forwarding and serial forwarding. GPS data format is based on NMEA 0183 protocol.
This article describes the configuration of GPS forwarding to get location. Before using GPS ensure your router model supports GPS feature, GPS antenna is installed in correct connector and placed outdoors.
Requirement
- Serial Port Utility: Receive serial port data
- NetAssist: Simulate as TCP server/client
- Milesight Router which supports GPS
Serial Forwarding
Step 1. Router configuration
- Login router’s Web GUI and go to Industrial -> GPS -> GPS to enable GPS function at first. The router will start to obtain GPS data automatically and display info on the Status -> GPS

- Go to Industrial -> Serial Port -> Serial Setting to enable Serial Port function at first. Then set the Serial Mode as GPS. The other parameters can keep by default or the same as your serial device.

- Go to Industrial -> GPS -> GPS Serial Forwarding to enable GPS Serial Forwarding function and select necessary information.
- Trap Interval: the interval of GPS data transmitting. Every 30s is the default setting.
- Include RMC/GSA/GGA/GSV: Types of GPS Info (by default all info are checked).

Step 2. Serial Port Utility Configuration
- Connect RS232/RS485 of router to PC.
- Set basic serial port parameters as you set on the Industrial -> Serial Port -> Serial Setting page of the Web GUI on router. Then open the serial port tool.

Step 3. Test Result
We can get the GPS location via serial port.

IP Forwarding (as Server)
Step 1. Router configuration
- Login router’s Web GUI and go to Industrial -> GPS -> GPS to enable GPS function at first. The router will start to obtain GPS data automatically and display info on the Status -> GPS

- Go to Industrial -> GPS -> GPS IP Forwarding to enable GPS IP Forwarding function at first.
- Type: the router works as Server, only supports TCP protocol.
- Keepalive Interval & Keepalive Retry: Related options for TCP connection, just keep the default.
- Local Port: the router listening port. Range: 1-65535.
- Include RMC/GSA/GGA/GSV: Types of GPS Info (by default all info are checked).
- Message Prefix: Add a prefix to the GPS data.
- Message Suffix: Add a suffix to the GPS data.

Step 2. Configuration of NetAssist
Select tool working mode as TCP Client, then fill in the address of Milesight Industrial Router and port as you set on the Industrial -> GPS -> GPS IP Forwarding page of the Web GUI on router.
Step 3. Test Result 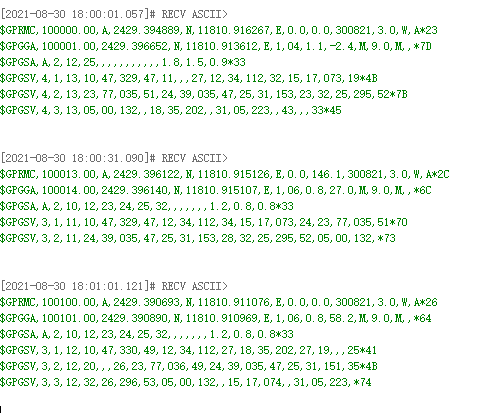
IP Forwarding (as Client)
Step 1. Router configuration
- Login router’s Web GUI and go to Industrial -> GPS -> GPS to enable GPS function at first. The router will start to obtain GPS data automatically and display info on the Status -> GPS

- Go to Industrial -> GPS -> GPS IP Forwarding to enable GPS IP Forwarding function at first.
GPS IP Forwarding:
- Type: the router works as Client.
- Protocol: Select TCP or UDP protocol of data transmission.
- Reconnect Retry: After connection failure, router will reconnect to the server at the preset interval, in seconds. The range is 10-60.
Destination IP Address:
- Server Address: Fill in the server address to receive GPS data (IP/domain name).
- Server port: Fill in the port to receive GPS data. Range: 1-65535.
- Status: Show the connection status between the route.

Step 2. Configuration of NetAssist
Select tool working mode as Server and configure the server IP address/port to receive GPS data from router.

Step 3. Test Result 
Was this article helpful?
That’s Great!
Thank you for your feedback
Sorry! We couldn't be helpful
Thank you for your feedback
Feedback sent
We appreciate your effort and will try to fix the article